问题分析:
1.程序属于CPU密集型,和开发沟通过,排除此类情况。
2.程序代码有问题,出现死循环,可能性极大。
解决过程:
1.根据top命令,发现PID为2633的Java进程占用CPU高达300%,出现故障。
2.找到该进程后,如何定位具体线程或代码呢,首先显示线程列表,并按照CPU占用高的线程排序:
[root@localhost logs]# ps -mp 2633 -o THREAD,tid,time | sort -rn
显示结果如下:
USER %CPU PRI SCNT WCHAN USER SYSTEM TID TIME
root 10.5 19 – – – – 3626 00:12:48
root 10.1 19 – – – – 3593 00:12:16
找到了耗时最高的线程3626,占用CPU时间有12分钟了!
将需要的线程ID转换为16进制格式:
[root@localhost logs]# printf “%x\n” 3626
e18
最后打印线程的堆栈信息:
[root@localhost logs]# jstack 2633 |grep e18 -A 30
将输出的信息发给开发人员进行确认,这样就能找出有问题的代码。
centos6.5重新调整/home和跟目录/大小
0. 说明
系统刚刚安装完之后,默认到/home有1.5TiB,而根分区只有200G。现在是要将VolGroup-lv_home缩小到200G,并将剩余的空间添加给VolGroup-lv_root。
1.查看磁盘使用情况
[root@slave2 jaydisk]# df -h
Filesystem Size Used Avail Use% Mounted on
/dev/mapper/VolGroup-lv_root 50G 3.1G 44G 7% /
tmpfs 16G 68K 16G 1% /dev/shm
/dev/sda2 485M 39M 421M 9% /boot
/dev/sda1 200M 272K 200M 1% /boot/efi
/dev/mapper/VolGroup-lv_home 1.6T 442M 1.5T 1% /home
2.卸载/home
使用root权限操作:
[root@slave2 jaydisk]# umount /home
umount /home 如果提示无法卸载,则是有进程占用/home,使用如下命令来终止占用进程:
[root@slave2 jaydisk]# fuser -m /home
3.调整分区大小
[root@slave2 jaydisk]# resize2fs -p /dev/mapper/VolGroup-lv_home 200G
resize2fs 1.41.12 (17-May-2010)
Please run ‘e2fsck -f /dev/mapper/VolGroup-lv_home’ first.
如果提示运行“e2fsck -f /dev/mapper/VolGroup-lv_home”,则执行相关命令:
[root@slave2 jaydisk]# e2fsck -f /dev/mapper/VolGroup-lv_home
然后重新执行命令:
[root@slave2 jaydisk]# resize2fs -p /dev/mapper/VolGroup-lv_home 200G
注:resize2fs为重新设定磁盘大小
4.挂载上/home,查看磁盘使用情况
[root@slave2 jaydisk]# mount /home
[root@slave2 jaydisk]# df -h
5.设置空闲空间
使用lvreduce指令用于减少LVM逻辑卷占用的空间大小。可能会删除逻辑卷上已有的数据,所以在操作前必须进行确认。记得输入 “y”:
[root@slave2 jaydisk]# lvreduce -L 200G /dev/mapper/VolGroup-lv_home
注:lvreduce -L 200G的意思为设置当前文件系统为200G,如果lvreduce -l 200G是指从当前文件系统上减少200G
使用lvreduce减小逻辑卷的大小。
注意:减小后的大小不能小于文件的大小,否则会丢失数据。
可以使用vgdisplay命令等查看一下可以操作的大小。也可以是用fdisk -l命令查看详细信息。
[root@slave2 jaydisk]# vgdisplay
— Volume group —
…
PE Size 4.00 MiB
Total PE 428656
Alloc PE / Size 68022 / 265.71 GiB
Free PE / Size 360634 / 1.38 TiB #这一行就是空闲的空间大小,等一下全部都分给根分区
VG UUID a0DPCG-oIpJ-2m0S-23R6-ehrt-dBLr-LV5Szo
…
注:vgdisplay为显示LVM卷组的元数据信息。找到“Free PE / Size”,就是空闲的空间大小,等一下全部都分给根分区。
6.把闲置空间挂在到根目录下
[root@slave2 ~]# lvextend -L +1380GiB /dev/mapper/VolGroup-lv_root #给根分区增加1380G空间
Extending logical volume lv_root to 1.40 TiB
Logical volume lv_root successfully resized
[root@slave2 ~]# resize2fs -p /dev/mapper/VolGroup-lv_root #这个名字就是重新调整大小,执行时间较长,要耐心等待
resize2fs 1.41.12 (17-May-2010)
Filesystem at /dev/mapper/VolGroup-lv_root is mounted on /; on-line resizing required
old desc_blocks = 4, new_desc_blocks = 90
Performing an on-line resize of /dev/mapper/VolGroup-lv_root to 374865920 (4k) blocks.
The filesystem on /dev/mapper/VolGroup-lv_root is now 374865920 blocks long.
7.检查调整结果
[root@slave2 jaydisk]# df -h
使用软链接解决/home挂载目录磁盘不足问题
1.问题描述
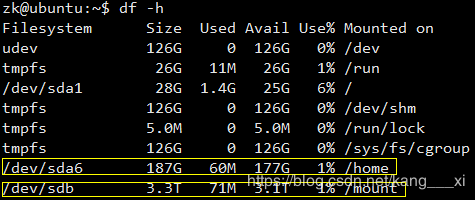
如下图,/dev/sda6挂载在/home目录下,即我们普通用户家目录下的数据都存放在/dev/sda6这个地方,它的大小只有187G,看着很大,但是一台服务器可能有十几个人同时使用,这样看就不大了,很容易就填满整个存储区域。但是我们也看到/dev/sdb下面有3.3T的存储空间,为什么我们不能通过它来解决我们容量不足的问题呢?
2.解决问题方法
我们知道windows中有快捷方式,而对应到linux中就有软链接,我们可以通过软链接解决问题:
以用户zk为例:
$cd /home/zk
$sudo rm -f /home/zk
$sudo mkdir /mount/zk # /mount这个目录是我自己创建用于专门挂载/dev/sdb的
$sudo ln -s /mount/zk /home/zk # 建立软链接
成功以后的效果如下:
zk@ubuntu:~$ cd /home/
zk@ubuntu:/home$ ls -lh
total 28
drwxr-xr-x 4 root root 4096 Nov 22 07:13 ./
drwxr-xr-x 24 root root 4096 Nov 22 03:23 ../
lrwxrwxrwx 1 root root 9 Nov 22 05:51 zk -> /mount/zk/
此时的/home/zk是/mount/zk的软链接,所以你存放在/home/zk目录下的文件实际存储位置是/mount/zk
3.碰到的问题
通过上面的方法创建的软链接确实可以解决提出来的问题,但是还有另一个问题是我们无法使用 ll(ls -l的别名) 这样的别名命令,原因是我们在上面执行命令 sudo rm -f /home/zk 时会删除隐藏文件.bashrc .bash_logout和.profile,这些文件里面有命令的别名,所以不能删除。如果你确实已经删除了,还可以补救,方法就是把其他用户的这三个文件拷贝到自己的家目录下。
使用extundelete恢复Linux下误删除文件(支持centos7下xfs格式)
常来说,对于重要文件我们都应该定期备份(如 /etc 下的配置文件),以免在喝醉了手残了等异常状态下将重要文件误删除。然而,如果意外真的发生,而我们又没有做好备份,那赶紧试试手动恢复吧,这里使用的文件恢复软件为 extundelete 。
1.重新挂载分区为只读状态:
这是恢复文件的第一步,也是最关键的步骤之一。假如我们误删除的文件为 /data/catalina.out , /data 目录为 /dev/sdb5 的挂载点,因为对分区的写操作可能会导致我们恢复文件失败,所以要将该分区重新挂载为只读形式:
[root@localhost ~]# mount -o remount,ro /dev/sdb5
执行该命令很可能会有错误提示出现,一般来说为目录被占用等信息,如下:
mount: /data isbusy
这时使用 fuser 命令查看哪些用户的那些进程在使用该目录:
fuser命令找不到,请安装 yum install -y psmisc
[root@localhost ~]# fuser -mv /data
USER PID ACCESS COMMAND
/data: mysql 4345 F.c.. mysqld
不难发现是 mysqld命令在使用该目录,在不知道如何关闭 mysql 的情况下,使用 killall 命令结束进程:
[root@localhost ~]# killall mysqld
之后再次挂载便可成功:
[root@localhost ~]# mount -o remount,ro /dev/sdb5
通过在 /data 目录下新建文件检验分区是否已经不可写入:
[root@localhost ~]# touch /data/testfile.txt
touch: cannottouch `/data/testfile.txt’: Read-only file system
出现以上信息表明此时/data 目录已经变为只读。
2.安装extundelete:
exundelete 官方网站http://extundelete.sourceforge.net,在上面下载较慢,我们使用如下下载地址 http://nchc.dl.sourceforge.net/project/extundelete/extundelete/0.2.4/extundelete-0.2.4.tar.bz2:
[root@localhost ~]# cd /usr/local/src
[root@localhost src]# wget http://nchc.dl.sourceforge.net/project/extundelete/extundelete/0.2.4/extundelete-0.2.4.tar.bz2
[root@localhost src]# tar jxf extundelete-0.2.4.tar.bz2
[root@localhost src]# cd extundelete-0.2.4
./configure 过程中需要用到 gcc-c++ 库及 e2fsprogs-devel 库,使用yum 进行安装:
[root@localhost ~]# yum install -y gcc-c++ e2fsprogs-devel
库文件安装完成后,./configure , make , makeinstall :
[root@localhost extundelete-0.2.4]# ./configure –prefix=/usr/local/extundelete
[root@localhost extundelete-0.2.4]# make && make install
安装extundelete第二种方法yum直接安装
yum install extundelete -y
3.使用extundelete恢复文件:
[root@localhost ~]# cd /usr/local/extundelete
(1)查看指定分区下文件的删除状态:
[root@localhost extundelete]# ./bin/extundelete /dev/sdb5 –inode 2
File name | Inode number | Deleted status
. 2
.. 2
lost+found 11
mysql 49153
catalina.out 12 Deleted
.catalina.out.swp 12 Deleted
.catalina.out.swx 14 Deleted
其中,catalina.out是我们误删除的文件,现在其状态为已删除,使用如下命令恢复文件:
[root@localhost extundelete]# ./bin/extundelete /dev/sdb5 –restore-file catalina.out
NOTICE: Extendedattributes are not restored.
Loadingfilesystem metadata … 130 groups loaded.
Loading journaldescriptors … 4735 descriptors loaded.
Block 796156 isallocated.
Successfullyrestored file catalina.out
出现以上信息表示文件恢复成功,恢复后的文件位于当前目录下的RECOVERED_FILES 中:
[root@localhost extundelete]# ls RECOVERED_FILES
catalina.out
注:
如果想恢复整个分区上的文件,使用如下命令:
[root@localhost extundelete]# ./bin/extundelete /dev/sdb5 –restore-all
4.收尾工作:
恢复成功后别只顾着高兴,别忘了误删文件所在的分区仍在只读状态,将其重新挂载为读写状态:
[root@localhost ~]# mount -o remount,rw /dev/sdb5
将误删文件移动到原位置:
[root@localhost ~]# mv /usr/local/extundelete/ RECOVERED_FILES/catalina.out /data/
最后,吸取教训,做好备份,尽量避免误删除,因为误删后能否恢复谁也不敢肯定,同时,磁盘要做好分区,如果全部都在 / 分区下,想要恢复就难上加难了。
补充:fuser 命令
该命令可以显示出当前哪个程序在使用磁盘上的某个文件、挂载点甚至网络端口,并给出程序进程的详细信息。常用参数:
-m 指定要查看的分区或挂载点
-v 列出详细信息,如进程所属用户,进程相关命令等,如果不使用该参数则只列出 PID
-u 列出进程所属用户
-k 发送kill -9 信号结束与当前目录或挂载点相关的进程,使用 -signaln 可以指定其他信号量,但-signal 和 -k 同时使用时前者失效
假如现在要查看使用 /dev/sdb5 分区的进程,该分区的挂载点为 /data :
[root@localhost ~]# fuser -mv /dev/sd5 //或者
[root@localhost ~]# fuser -mv /data
Linux文件误删除debugfs恢复操作
前言
作为一个多用户、多任务的操作系统,Linux下的文件一旦被删除,是难以恢复的。尽管删除命令只是在文件节点中作删除标记,并不真正清除文件内容,但是其他用户和一些有写盘动作的进程会很快覆盖这些数据。不过,对于家庭单机使用的Linux,或者误删文件后及时补救,还是可以恢复的
一、用运SecureCRT远程对操作系统上,查看一下当前系统版本号,及文件系统格式
[root@centos6 ~]# cat /etc/redhat-release
CentOS release 6.8 (Final)
[root@centos6 ~]# cat /proc/version
Linux version 2.6.32-642.el6.x86_64 (mockbuild@worker1.bsys.centos.org) (gcc version 4.4.7 20120313 (Red Hat 4.4.7-17) (GCC) ) #1 SMP Tue May 10 17:27:01 UTC 2016
[root@centos6 ~]# uname -a
Linux centos6 2.6.32-642.el6.x86_64 #1 SMP Tue May 10 17:27:01 UTC 2016 x86_64 x86_64 x86_64 GNU/Linux
[root@centos6 ~]# uname -r
2.6.32-642.el6.x86_64
二、为方便本次实验,我们新创建一文件。
[root@centos6 ~]# mkdir /example
[root@centos6 ~]# cd /example/
[root@centos6 example]# cat /proc/meminfo > web.txt
[root@centos6 example]# ll
total 4
-rw-r–r–. 1 root root 1198 Dec 25 05:35 web.txt
[root@centos6 example]# df /example/
Filesystem 1K-blocks Used Available Use% Mounted on
/dev/mapper/vg_centos6-LogVol01
18971088 3484148 14516600 20% /
[root@centos6 example]# debugfs
debugfs 1.41.12 (17-May-2010)
debugfs: open /dev/mapper/vg_centos6-LogVol01
debugfs: ls -d /example/
391720 (12) . 2 (12) .. 393297 (4072) web.txt
debugfs: quit
三、执行删除操作
[root@centos6 example]# rm -rf web.txt
四、打开,刚刚被删除文件所在的分区
[root@centos6 example]# df /example/
Filesystem 1K-blocks Used Available Use% Mounted on
/dev/mapper/vg_centos6-LogVol01
18971088 3484148 14516600 20% /
五、用ls 加-d参数显示刚刚删除文件所在的目录
[root@centos6 example]# debugfs
debugfs 1.41.12 (17-May-2010)
debugfs: open /dev/mapper/vg_centos6-LogVol01
debugfs: ls -d /example/
391720 (12) . 2 (4084) .. <393297> (4072) web.txt
六、显示有<>尖括号的就是我们要找的文件Inode 号 执行logdump –I <19662057>
debugfs: logdump -i <393297>
Inode 393297 is at group 48, block 1572970, offset 2048
Journal starts at block 1, transaction 1746
No magic number at block 435: end of journal.
debugfs: quit
七,执行完命令后,显示了一屏信息,我们需要的是下面这一行,并且要记住,后面的值
No magic number at block 435: end of journal.
debugfs: quit
九、退出dedugfs
qiut
十,执行如下命令
[root@centos6 example]# dd if=/dev/mapper/vg_centos6-LogVol01 of=/example/web.txt bs=2048 count=1 skip=1572970
1+0 records in
1+0 records out
2048 bytes (2.0 kB) copied, 0.00769495 s, 266 kB/s
十一,以上结果表示恢复成功我们看下/example目录下到底有没有
[root@centos6 example]# ll /example/
total 4
-rw-r–r–. 1 root root 2048 Dec 25 05:52 web.txt
————————————————————————————————————————————————————————
centos7不管用
一、用运SecureCRT远程对操作系统上,查看一下当前系统版本号,及文件系统格式
[root@sheng ~]# cat /etc/redhat-release
CentOS Linux release 7.4.1708 (Core)
[root@sheng ~]# cat /proc/version
Linux version 3.10.0-693.5.2.el7.x86_64 (builder@kbuilder.dev.centos.org) (gcc version 4.8.5 20150623 (Red Hat 4.8.5-16) (GCC) ) #1 SMP Fri Oct 20 20:32:50 UTC 2017
[root@sheng ~]# uname -a
Linux sheng 3.10.0-693.5.2.el7.x86_64 #1 SMP Fri Oct 20 20:32:50 UTC 2017 x86_64 x86_64 x86_64 GNU/Linux
[root@sheng ~]# uname -r
二、为方便本次实验,我们新创建一文件。
[root@sheng ~]# mkdir example
[root@sheng ~]# cd example/
[root@sheng example]# cat /proc/meminfo > web.txt
[root@sheng example]# ll
total 4
-rw-r–r–. 1 root root 1226 Dec 25 10:03 web.txt
[root@sheng example]# ls
web.txt
三、执行删除操作
[root@sheng example]# rm -rf web.txt
四、打开,刚刚被删除文件所在的分区
*****************************************************************************************
查看目录在分区
[root@sheng example]# df /root/example
Filesystem 1K-blocks Used Available Use% Mounted on
/dev/mapper/cl-root 18855936 11376924 7479012 61% /
******************************************************************************************
四、运用,系统自还工具debugfs来修复
[root@sheng example]# debugfs
debugfs 1.42.9 (28-Dec-2013)
debugfs: open /dev/mapper/cl-root
/dev/mapper/cl-root: Bad magic number in super-block while opening filesystem
[root@sheng example]# df -Th
Filesystem Type Size Used Avail Use% Mounted on
/dev/mapper/cl-root xfs 18G 11G 7.2G 61% /
…..
不支持xfs文件格式的恢复
NTFS(Windows)、ext4(RHEL6)和xfs(RHEL7)文件系统的误删除恢复和备份
对于误删除文件的设备,要马上停止任何写的操作,防止删除的文件被覆盖,导致数据丢失!
恢复NTFS文件系统下误删的文件
以Windows为例,市面上能恢复的工具不少,例如EasyRecovery、易我数据恢复等等,本文就不再赘述,可以自行百度谷歌!
恢复ext4文件系统下误删的文件
[root@linux-node1 ~]# fdisk /dev/sdb
Device contains neither a valid DOS partition table, nor Sun, SGI or OSF disklabel
Building a new DOS disklabel with disk identifier 0x7ce28911.
Changes will remain in memory only, until you decide to write them.
After that, of course, the previous content won’t be recoverable.
Warning: invalid flag 0x0000 of partition table 4 will be corrected by w(rite)
WARNING: DOS-compatible mode is deprecated. It’s strongly recommended to
switch off the mode (command ‘c’) and change display units to
sectors (command ‘u’).
Command (m for help): n
Command action
e extended
p primary partition (1-4)
p
Partition number (1-4): 1
First cylinder (1-2610, default 1):
Using default value 1
Last cylinder, +cylinders or +size{K,M,G} (1-2610, default 2610): +1G
Command (m for help): w
The partition table has been altered!
Calling ioctl() to re-read partition table.
Syncing disks.
[root@linux-node1 ~]# mkfs.ext4 /dev/sdb1
mke2fs 1.41.12 (17-May-2010)
Filesystem label=
OS type: Linux
Block size=4096 (log=2)
Fragment size=4096 (log=2)
Stride=0 blocks, Stripe width=0 blocks
66384 inodes, 265064 blocks
13253 blocks (5.00%) reserved for the super user
First data block=0
Maximum filesystem blocks=272629760
9 block groups
32768 blocks per group, 32768 fragments per group
7376 inodes per group
Superblock backups stored on blocks:
32768, 98304, 163840, 229376
Writing inode tables: done
Creating journal (8192 blocks): done
Writing superblocks and filesystem accounting information: done
This filesystem will be automatically checked every 36 mounts or
180 days, whichever comes first. Use tune2fs -c or -i to override.
[root@linux-node1 ~]# mkdir /sdb1
[root@linux-node1 ~]# mount /dev/sdb1 /sdb1/
[root@linux-node1 ~]# df -h
Filesystem Size Used Avail Use% Mounted on
/dev/sda3 19G 2.4G 16G 14% /
tmpfs 931M 0 931M 0% /dev/shm
/dev/sda1 190M 38M 142M 22% /boot
/dev/sdb1 988M 1.3M 935M 1% /sdb1
[root@linux-node1 ~]# cd /sdb1/
[root@linux-node1 sdb1]# ll
total 16
drwx—— 2 root root 16384 Oct 4 16:19 lost+found
[root@linux-node1 sdb1]# cp /etc/passwd .
[root@linux-node1 sdb1]# mkdir test
[root@linux-node1 sdb1]# mkdir test/a/b/c -p
[root@linux-node1 sdb1]# echo “1234”>>1.txt
[root@linux-node1 sdb1]# ll
total 28
-rw-r–r– 1 root root 5 Oct 4 16:24 1.txt
drwx—— 2 root root 16384 Oct 4 16:19 lost+found
-rw-r–r– 1 root root 1929 Oct 4 16:23 passwd
drwxr-xr-x 3 root root 4096 Oct 4 16:23 test
[root@linux-node1 sdb1]# cp 1.txt ./test/a/
[root@linux-node1 sdb1]# cp 1.txt ./test/a/b/
[root@linux-node1 sdb1]# tree
.
├── 1.txt
├── lost+found
├── passwd
└── test
└── a
├── 1.txt
└── b
├── 1.txt
└── c
5 directories, 4 files
[root@linux-node1 sdb1]# cd
[root@linux-node1 ~]# rz extundelete-0.2.4.tar.bz2
[root@linux-node1 ~]# tar jxvf extundelete-0.2.4.tar.bz2
[root@linux-node1 ~]# cd extundelete-0.2.4
[root@linux-node1 extundelete-0.2.4]# yum install -y e2fsprogs-devel
[root@linux-node1 extundelete-0.2.4]# ./configure
[root@linux-node1 extundelete-0.2.4]# make -j 4
[root@linux-node1 extundelete-0.2.4]# make install
Making install in src
/usr/bin/install -c extundelete ‘/usr/local/bin’
[root@linux-node1 extundelete-0.2.4]# ll /usr/local/bin/
total 1160
-rwxr-xr-x 1 root root 1187263 Oct 7 21:34 extundelete
[root@linux-node1 ~]# yum install -y extundelete ##实在不行就用yum安装
[root@linux-node1 ~]# rm -rf /sdb1/*
[root@linux-node1 ~]# umount /sdb1/
[root@linux-node1 ~]# mkdir /root/back
[root@linux-node1 ~]# cd back/
方法1:通过inode恢复被删除的文件(ext4文件系统的分区根目录的inode值为2)
[root@linux-node1 back]# extundelete /dev/sdb1 –inode 2
NOTICE: Extended attributes are not restored.
Loading filesystem metadata … 9 groups loaded.
Group: 0
Contents of inode 2:
0000 | ed 41 00 00 00 10 00 00 07 0d ba 5b 0f 0d ba 5b | .A………[…[
0010 | 0f 0d ba 5b 00 00 00 00 00 00 02 00 08 00 00 00 | …[…………
0020 | 00 00 00 00 07 00 00 00 4b 00 00 00 00 00 00 00 | ……..K…….
0030 | 00 00 00 00 00 00 00 00 00 00 00 00 00 00 00 00 | …………….
0040 | 00 00 00 00 00 00 00 00 00 00 00 00 00 00 00 00 | …………….
0050 | 00 00 00 00 00 00 00 00 00 00 00 00 00 00 00 00 | …………….
0060 | 00 00 00 00 00 00 00 00 00 00 00 00 00 00 00 00 | …………….
0070 | 00 00 00 00 00 00 00 00 00 00 00 00 00 00 00 00 | …………….
0080 | 1c 00 00 00 88 d8 89 9c 88 d8 89 9c 8c 33 43 58 | ………….3CX
0090 | 19 cd b5 5b 00 00 00 00 00 00 00 00 00 00 00 00 | …[…………
00a0 | 00 00 00 00 00 00 00 00 00 00 00 00 00 00 00 00 | …………….
00b0 | 00 00 00 00 00 00 00 00 00 00 00 00 00 00 00 00 | …………….
00c0 | 00 00 00 00 00 00 00 00 00 00 00 00 00 00 00 00 | …………….
00d0 | 00 00 00 00 00 00 00 00 00 00 00 00 00 00 00 00 | …………….
00e0 | 00 00 00 00 00 00 00 00 00 00 00 00 00 00 00 00 | …………….
00f0 | 00 00 00 00 00 00 00 00 00 00 00 00 00 00 00 00 | …………….
Inode is Allocated
File mode: 16877
Low 16 bits of Owner Uid: 0
Size in bytes: 4096
Access time: 1538919687
Creation time: 1538919695
Modification time: 1538919695
Deletion Time: 0
Low 16 bits of Group Id: 0
Links count: 2
Blocks count: 8
File flags: 0
File version (for NFS): 0
File ACL: 0
Directory ACL: 0
Fragment address: 0
Direct blocks: 75, 0, 0, 0, 0, 0, 0, 0, 0, 0, 0, 0
Indirect block: 0
Double indirect block: 0
Triple indirect block: 0
File name | Inode number | Deleted status
. 2
.. 2
lost+found 11 Deleted
passwd 12 Deleted
test 7377 Deleted
1.txt 16 Deleted
[root@linux-node1 back]# extundelete /dev/sdb1 –restore-inode 12
[root@linux-node1 back]# tree
.
└── RECOVERED_FILES
└── file.12
1 directory, 1 file
[root@linux-node1 back]# diff /etc/passwd RECOVERED_FILES/file.12
[root@linux-node1 back]#
方法2:通过文件名恢复数据
[root@linux-node1 back]# extundelete /dev/sdb1 –restore-file passwd
NOTICE: Extended attributes are not restored.
Loading filesystem metadata … 9 groups loaded.
Loading journal descriptors … 76 descriptors loaded.
Successfully restored file passwd
[root@linux-node1 back]# tree
.
└── RECOVERED_FILES
├── file.12
└── passwd
1 directory, 2 files
[root@linux-node1 back]# diff
diff diff3 diffstat
[root@linux-node1 back]# diff RECOVERED_FILES/
file.12 passwd
[root@linux-node1 back]# diff RECOVERED_FILES/passwd /etc/passwd
[root@linux-node1 back]#
方法3:通过目录恢复数据
[root@linux-node1 back]# extundelete /dev/sdb1 –restore-directory test
NOTICE: Extended attributes are not restored.
Loading filesystem metadata … 9 groups loaded.
Loading journal descriptors … 76 descriptors loaded.
Searching for recoverable inodes in directory test …
9 recoverable inodes found.
Looking through the directory structure for deleted files …
4 recoverable inodes still lost.
[root@linux-node1 back]# tree
.
└── RECOVERED_FILES
├── file.12
├── passwd
└── test
└── a
├── 1.txt
└── b
└── 1.txt
4 directories, 4 files
[root@linux-node1 back]# cat RECOVERED_FILES/test/a/1.txt
1234
[root@linux-node1 back]# cat RECOVERED_FILES/test/a/b/1.txt
1234
方法4:恢复所有数据
[root@linux-node1 back]# rm -rf RECOVERED_FILES/
[root@linux-node1 back]# ll
total 0
[root@linux-node1 back]# extundelete /dev/sdb1 –restore-all
NOTICE: Extended attributes are not restored.
Loading filesystem metadata … 9 groups loaded.
Loading journal descriptors … 76 descriptors loaded.
Searching for recoverable inodes in directory / …
9 recoverable inodes found.
Looking through the directory structure for deleted files …
0 recoverable inodes still lost.
[root@linux-node1 back]# tree
.
└── RECOVERED_FILES
├── 1.txt
├── passwd
└── test
└── a
├── 1.txt
└── b
└── 1.txt
4 directories, 4 files
[root@linux-node1 back]# diff RECOVERED_FILES/passwd /etc/passwd
[root@linux-node1 back]# cat RECOVERED_FILES/test/a/1.txt
1234
[root@linux-node1 back]# cat RECOVERED_FILES/test/a/b/1.txt
1234
extundelete在恢复文件的时候不能自动创建空文件和目录
xfs文件系统中用xfsdump备份和恢复文件
一、挂载一块新的磁盘
[root@zabbix-server ~]# fdisk /dev/sdb
Welcome to fdisk (util-linux 2.23.2).
Changes will remain in memory only, until you decide to write them.
Be careful before using the write command.
Device does not contain a recognized partition table
Building a new DOS disklabel with disk identifier 0xac54c138.
Command (m for help): p
Disk /dev/sdb: 21.5 GB, 21474836480 bytes, 41943040 sectors
Units = sectors of 1 * 512 = 512 bytes
Sector size (logical/physical): 512 bytes / 512 bytes
I/O size (minimum/optimal): 512 bytes / 512 bytes
Disk label type: dos
Disk identifier: 0xac54c138
Device Boot Start End Blocks Id System
Command (m for help): n
Partition type:
p primary (0 primary, 0 extended, 4 free)
e extended
Select (default p): p
Partition number (1-4, default 1):
First sector (2048-41943039, default 2048):
Using default value 2048
Last sector, +sectors or +size{K,M,G} (2048-41943039, default 41943039): +1G
Partition 1 of type Linux and of size 1 GiB is set
Command (m for help): w
The partition table has been altered!
Calling ioctl() to re-read partition table.
Syncing disks.
[root@zabbix-server ~]# mkfs.xfs /dev/sdb1
meta-data=/dev/sdb1 isize=512 agcount=4, agsize=65536 blks
= sectsz=512 attr=2, projid32bit=1
= crc=1 finobt=0, sparse=0
data = bsize=4096 blocks=262144, imaxpct=25
= sunit=0 swidth=0 blks
naming =version 2 bsize=4096 ascii-ci=0 ftype=1
log =internal log bsize=4096 blocks=2560, version=2
= sectsz=512 sunit=0 blks, lazy-count=1
realtime =none extsz=4096 blocks=0, rtextents=0
[root@zabbix-server ~]# mkdir /sdb1
[root@zabbix-server ~]# mount /dev/sdb1 /sdb1/
[root@zabbix-server ~]# cd /sdb1/
[root@zabbix-server sdb1]# cp /etc/passwd .
[root@zabbix-server sdb1]# mkdir test
[root@zabbix-server sdb1]# touch test/a.txt
[root@zabbix-server sdb1]# tree
.
├── passwd
└── test
└── a.txt
1 directory, 2 files
二、进行备份
2.1、备份整个分区(这个功能类似快照,能快速恢复)
注意:备份的路径不能写成/sdb1/ 应是/dev/sdb1 或/sdb1
[root@zabbix-server ~]# xfsdump -f /opt/dump-sdb1 /dev/sdb1
xfsdump: using file dump (drive_simple) strategy
xfsdump: version 3.1.7 (dump format 3.0) – type ^C for status and control
============================= dump label dialog ==============================
please enter label for this dump session (timeout in 300 sec)
-> dump-sdb1
session label entered: “dump-sdb1”
——————————— end dialog ———————————
xfsdump: level 0 dump of zabbix-server:/sdb1
xfsdump: dump date: Sun Oct 7 14:00:24 2018
xfsdump: session id: c0ae2a93-b6f4-4d9f-9ccb-a2a2a1355ce2
xfsdump: session label: “dump-sdb1”
xfsdump: ino map phase 1: constructing initial dump list
xfsdump: ino map phase 2: skipping (no pruning necessary)
xfsdump: ino map phase 3: skipping (only one dump stream)
xfsdump: ino map construction complete
xfsdump: estimated dump size: 25856 bytes
xfsdump: /var/lib/xfsdump/inventory created
============================= media label dialog =============================
please enter label for media in drive 0 (timeout in 300 sec)
-> sdb1-v1
media label entered: “sdb1-v1”
——————————— end dialog ———————————
xfsdump: creating dump session media file 0 (media 0, file 0)
xfsdump: dumping ino map
xfsdump: dumping directories
xfsdump: dumping non-directory files
xfsdump: ending media file
xfsdump: media file size 23520 bytes
xfsdump: dump size (non-dir files) : 1568 bytes
xfsdump: dump complete: 137 seconds elapsed
xfsdump: Dump Summary:
xfsdump: stream 0 /opt/dump-sdb1 OK (success)
xfsdump: Dump Status: SUCCESS
2.1.1、指定备份时免交互操作,方便后期做定时备份
[root@zabbix-server ~]# xfsdump -f /opt/dump-sdb1 /sdb1 -L dump-sdb1 -M sdb1-v2
xfsdump: using file dump (drive_simple) strategy
xfsdump: version 3.1.7 (dump format 3.0) – type ^C for status and control
…….
xfsdump: Dump Status: SUCCESS
2.1.2、备份某分区的目录或文件
参数:-s 文件路径,针对指定的文件进行备份,-s 指定时,路径写的是相对路径
[root@zabbix-server ~]# xfsdump -f /opt/dump-boot.grub2 -s grub2/fonts /boot -L dump-boot -M boot.grub2
xfsdump: using file dump (drive_simple) strategy
xfsdump: version 3.1.7 (dump format 3.0) – type ^C for status and control
…….
xfsdump: Dump Status: SUCCESS
2.1.3、查看备份的信息
[root@zabbix-server ~]# ll /var/lib/xfsdump/inventory/
total 28
-rw-r–r– 1 root root 312 Oct 7 14:30 036e12ba-88fc-4e0c-9eb1-2fe312d02176.InvIndex
-rw-r–r– 1 root root 312 Oct 7 14:12 117f7835-83c8-471b-b69f-55743fa9f8e7.InvIndex
-rw-r–r– 1 root root 5080 Oct 7 14:30 bd6e4e4d-6f0d-47e5-be33-bb0faa452331.StObj
-rw-r–r– 1 root root 6416 Oct 7 14:12 d40f0506-c377-40c3-a3ad-df2c2ecd65af.StObj
-rw-r–r– 1 root root 1120 Oct 7 14:30 fstab
[root@zabbix-server ~]# xfsdump -I
file system 0:
fs id: 117f7835-83c8-471b-b69f-55743fa9f8e7
session 0:
media id: 60cf7316-3c71-4899-bf7e-1215d7ddb9f1
…….
session 1:
mount point: zabbix-server:/sdb1
…….
session 2:
mount point: zabbix-server:/sdb1
…….
session 3:
mount point: zabbix-server:/sdb1
…….
xfsdump: Dump Status: SUCCESS
三、xfs文件系统的恢复和增量备份
3.1、文件的恢复
[root@zabbix-server ~]# rm -rf /sdb1/*
[root@zabbix-server ~]# tree /sdb1/
/sdb1/
0 directories, 0 files
[root@zabbix-server ~]# xfsrestore -f /opt/dump-sdb1 /sdb1/
xfsrestore: using file dump (drive_simple) strategy
xfsrestore: version 3.1.7 (dump format 3.0) – type ^C for status and control
…….
xfsrestore: Restore Status: SUCCESS
[root@zabbix-server ~]# tree /sdb1/
/sdb1/
├── passwd
└── test
└── a.txt
1 directory, 2 files
3.2、文件的增量备份和恢复
3.2.1:增量备份
[root@zabbix-server ~]# tree /sdb1/
/sdb1/
├── passwd
└── test
└── a.txt
1 directory, 2 files
[root@zabbix-server ~]# xfsdump -f /opt/dump-full /sdb1 -L sdb1-full -M sdb1
xfsdump: using file dump (drive_simple) strategy
xfsdump: version 3.1.7 (dump format 3.0) – type ^C for status and control
…….
xfsdump: Dump Status: SUCCESS
[root@zabbix-server ~]# touch /sdb1/a.txt /sdb1/b.txt
[root@zabbix-server ~]# tree /sdb1/
/sdb1/
├── a.txt
├── b.txt
├── passwd
└── test
└── a.txt
1 directory, 4 files
[root@zabbix-server ~]# xfsdump -l 1 -f /opt/dump-bak1 /sdb1 -L sdb1-full -M sdb1
xfsdump: using file dump (drive_simple) strategy
xfsdump: version 3.1.7 (dump format 3.0) – type ^C for status and control
…….
xfsdump: Dump Status: SUCCESS
[root@zabbix-server ~]# touch /sdb1/test/1.txt /sdb1/test/2.txt
[root@zabbix-server ~]# tree /sdb1/
/sdb1/
├── a.txt
├── b.txt
├── passwd
└── test
├── 1.txt
├── 2.txt
└── a.txt
1 directory, 6 files
[root@zabbix-server ~]# xfsdump -l 2 -f /opt/dump-bak2 /sdb1 -L sdb1-full -M sdb1
xfsdump: using file dump (drive_simple) strategy
xfsdump: version 3.1.7 (dump format 3.0) – type ^C for status and control
…….
xfsdump: Dump Status: SUCCESS
3.2.2:备份恢复
[root@zabbix-server ~]# rm -rf /sdb1/*
[root@zabbix-server ~]# tree /sdb1/
/sdb1/
0 directories, 0 files
[root@zabbix-server ~]# xfsrestore -f /opt/dump-full /sdb1/
xfsrestore: using file dump (drive_simple) strategy
xfsrestore: version 3.1.7 (dump format 3.0) – type ^C for status and control
…….
xfsrestore: Restore Status: SUCCESS
[root@zabbix-server ~]# tree /sdb1/
/sdb1/
├── passwd
└── test
└── a.txt
1 directory, 2 files
[root@zabbix-server ~]# xfsrestore -f /opt/dump-bak1 /sdb1/
xfsrestore: using file dump (drive_simple) strategy
xfsrestore: version 3.1.7 (dump format 3.0) – type ^C for status and control
…….
xfsrestore: Restore Status: SUCCESS
[root@zabbix-server ~]# tree /sdb1/
/sdb1/
├── a.txt
├── b.txt
├── passwd
└── test
└── a.txt
1 directory, 4 files
[root@zabbix-server ~]# xfsrestore -f /opt/dump-bak2 /sdb1/
xfsrestore: using file dump (drive_simple) strategy
xfsrestore: version 3.1.7 (dump format 3.0) – type ^C for status and control
…….
xfsrestore: Restore Status: SUCCESS
[root@zabbix-server ~]# tree /sdb1/
/sdb1/
├── a.txt
├── b.txt
├── passwd
└── test
├── 1.txt
├── 2.txt
└── a.txt
1 directory, 6 files
VMware全屏时, 隐藏上方横条或工具栏
第一种方法
- 菜单栏打开 编辑
- 选择 首选项
- 找到 显示
- 取消勾选 在全屏时取消固定时显示工具栏边缘

第二种方法
之前用的是ubuntu虚拟机,对于vmware菜单栏的问题没在意,也没影响,现在用的是centos系统,全屏后,vmware的菜单栏还在,影响输入法啥的切换,便花时间解决这个问题,其实很简单!
1、用Ctrl + Alt + Enter 切换全屏、非全屏
2、对于选项卡的隐藏。Vmare新版本右击不能直接设置,通过【查看】===【选项卡】把前面的对勾去掉
CentOS查看你是否有USB 3.0端口
近来的大多数的新计算机都有了USB 3.0接口了。但是你怎么知道你的计算机有没有USB 3.0接口?这篇短文中,我们会告诉如何在Linux下知道你的系统上有USB 3还是USB3接口。
在Linux终端中检测是否有USB 3.0 端口
打开一个终端,并使用下面的命令:
lsusb
这个命令会显示你系统下USB的总线信息。检查一下结果,如果你看到像“3.0 root hub”字样,这意味着你系统有USB 3.0。比如,在我的电脑上,它这样显示:
这个技巧在所有的Linux系统上,像Ubuntu,Linux Mint,Fedora等等都有效。现在当你知道你有USB 3.0 端口之后,**如何辨别哪个口是USB 3.0,哪个是USB 2.0。
辨别哪个口是USB 3.0
通常USB 3.0 口被标记为SS(“Super Speed”的缩写)。如果你的系统制造商没有标记SS或者USB 3,那么你可以检查端口的内部通常是蓝色的。
我希望这个快捷提示能够帮助你知道你系统是否有USB 3.0 并可以分辨出USB 3.0 口
关于CentOS/RHEL 7.x的yum组安装错误的解决方案
今天使用CentOS 7的组安装,结果发现提示错误,
yum groupinstall "System Administration Tools"
详细信息如下:
Loaded plugins: fastestmirror, langpacks
Loading mirror speeds from cached hostfile
* base: mirrors.aliyun.com
* extras: mirrors.aliyun.com
* updates: mirrors.aliyun.com
Warning: Group system-admin-tools does not have any packages to install.
Maybe run: yum groups mark install (see man yum)
No packages in any requested group available to install or update
经过一番谷歌,结果发现红帽的官方说7中的yum已经发生变化,需要使用特定选项来安装,具体命令如下:
[code]yum groupinstall “System Administration Tools” –setopt=group_package_types=mandatory,default,optional[/code]
原文解决方案地址:
https://access.redhat.com/solutions/1310043
Free Switch 端口配置
Free Switch处于防火墙内,因此需要在防火墙上开启相关端口映射,否则无法接收到数据包.
下表为各个模块默认使用的端口列表
Free Switch处于防火墙内,因此需要在防火墙上开启相关端口映射,否则无法接收到数据包.
下表为各个模块默认使用的端口列表:
| FireWall Ports | Network Protocol |
Application Protocol | Description |
| 1719 | UDP | H.323 Gatekeeper RAS port | |
| 1720 | TCP | H.323 Call Signaling | |
| 3478 | UDP | STUN service | Used for NAT traversal |
| 3479 | UDP | STUN service | Used for NAT traversal |
| 5002 | TCP | MLP protocol server | |
| 5003 | UDP | Neighborhood service | |
| 5060 | UDP & TCP | SIP UAS | Used for SIP signaling (Standard SIP Port, for default Internal Profile) |
| 5070 | UDP & TCP | SIP UAS | Used for SIP signaling (For default “NAT” Profile) |
| 5080 | UDP & TCP | SIP UAS | Used for SIP signaling (For default “External” Profile) |
| 8021 | TCP | ESL | Used for mod_event_socket * |
| 16384-32768 | UDP | RTP/ RTCP multimedia streaming |
Used for audio/video data in SIP and other protocols |
| 5066 | TCP | Websocket | Used for WebRTC |
| 7443 | TCP | Websocket | Used for WebRTC |
其中本地端口对应的是RTP端口范围,可在FreeSwitch\conf\autoload_configs\switch.conf.xml下配置,
远程端口对应的是,客户端指定的auto rtp port,其范围可在所使用的SIP客户端进行查找.