欢迎光临
我们一直在努力

sock5协议转换http协议工具polipo使用笔记(Centos7)

u22e阅读(888)

一、安装

Shadowsocks使用socks5协议,而终端很多工具目前只支持http和https等协议,所以我们为终端设置Shadowsocks的思路就是将socks5协议转换成http协议,然后为终端设置即可。

安装polipo(github地址:https://github.com/jech/polipo)

yum install -y texi2html texinfo
git clone https://github.com/jech/polipo.git
cd polipo
make all
make install

二、配置polipo

vi /etc/polipo/config

socksParentProxy = "127.0.0.1:10080" 
socksProxyType = socks5  
proxyAddress="0.0.0.0"  
proxyPort=58888  
logFile = /var/log/polipo
logLevel = 99
logSyslog = true
daemonise=true  
chunkHighMark = 50331648
objectHighMark = 16384

serverMaxSlots = 64
serverSlots = 16
serverSlots1 = 32

polipo -v 可以查看支持的选项

三、启动polipo

polipo -c /etc/polipo/config

四、polipo监听58888端口

[root@k8s polipo]# ss -lntup|grep polipo
tcp    LISTEN     0      128       *:58888                 *:*                   users:(("polipo",pid=57160,fd=5))

五、测试

curl -x 10.0.0.x:58888  ip.gs

六、添加http_proxy环境变量,实现全局代理

当前会话生效

[root@k8s ~]# export http_proxy=http://10.0.0.32:58888
[root@k8s ~]# export https_proxy=http://10.0.0.32:58888
[root@k8s ~]# curl ip.gs
Current IP / 当前 IP: xx.xx.xx.xx
ISP / 运营商:  xxxxx
City / 城市:  xx
Country / 国家: xx
IP.GS is now IP.SB, please visit https://ip.sb/ for more information. / IP.GS 已更改为 IP.SB ,请访问 https://ip.sb/ 获取更详细 IP 信息!
Please join Telegram group https://t.me/sbfans if you have any issues. / 如有问题,请加入 Telegram 群 https://t.me/sbfans

  /\_/\
=( °w° )=
  )   (  //
 (__ __)//

取消此环境变量,关闭代理

unset http_proxy

同时可以将下面环境变量设置的语句添加到/etc/profile、~/.bashrc等文件来实现更大的代理范围

polipo/privoxy 实现 Linux 系统全局/自动代理

u22e阅读(1296)

前言

操作系统为 Ubuntu。
客户端代理软件为 Python 版本 Shadow 和谐 socks 自带的 sslocal。

SS 安装和配置过程不再赘述。默认本地端口 1080,这里改成了 1081

sslocal 是 socks5 代理,需要一个软件进行 socks5 和 HTTP 的转换。
下面介绍 polipoprivoxy 两种。

polipo 貌似只能全局代理,privoxy 全局/自动两种代理方式都可以实现。

全局代理下,访问 localhost 时也会走代理,可能导致无法正常访问本地服务。

polipo 实现全局代理

安装 polipo:

apt-get update
apt-get install polipo
复制代码

polipo 的配置文件 /etc/polipo/config 初始内容只有 logSysloglogFile 两项。
添加以下内容:

# SS 的代理地址
socksParentProxy = "127.0.0.1:1081"
# 类型
socksProxyType = socks5
# 转换为 HTTP 之后的端口
proxyPort = 8123
# 下面的就不清楚了
chunkHighMark = 50331648
objectHighMark = 16384
serverMaxSlots = 64
serverSlots = 16
serverSlots1 = 32
proxyAddress = "0.0.0.0"
复制代码

8123 就是 HTTP 代理的端口了。

接下来把代理地址添加到环境变量。在 /etc/profile 添加以下内容:

export http_proxy="http://127.0.0.1:8123"
export https_proxy="http://127.0.0.1:8123"
复制代码

重新载入:

source /etc/profile
复制代码

启动 polipo:

service polipo start
复制代码

测试一下:

curl www.google.com
复制代码

privoxy 实现全局和自动代理

privoxy 可以配置 .action 格式的代理规则文件。通过控制规则文件实现全局和自动代理。

action 文件可以手动编辑,也可以从 gfwlist 生成。
下面将先介绍 privoxy 的安装配置,再介绍 action 文件的生成。

安装配置

安装 privoxy:

apt-get update
apt-get install privoxy
复制代码

进入目录 /etc/privoxy,可以看到目录结构大致为:

  • config 配置文件,这个文件很长。。
  • *.action 代理规则文件
  • *.filter 过滤规则文件
  • trust 不造干嘛用
  • templates/ 同上

开始修改配置文件。

privoxy 有 filter (过滤)的功能,可以用来实现广告拦截。不过这里只希望实现自动代理,在配置文件中把 filter 部分注释掉:

# 大约在435行
# filterfile default.filter
# filterfile user.filter      # User customizations
复制代码

我们将使用自定义的 action 文件,所以把默认的 action 文件注释掉,并添加自定义文件:

# 386行左右
# 默认的 action 文件
# actionsfile match-all.action # Actions that are applied to all sites and maybe overruled later on.
# actionsfile default.action   # Main actions file
# actionsfile user.action      # User customizations
# 自定义 action 文件
actionsfile my.action
复制代码

可以指定转换后的 HTTP 代理地址,这里直接使用默认端口 8118

# 785行左右
listen-address  127.0.0.1:8118
listen-address  [::1]:8118
复制代码

如果代理规则直接写在配置文件 config 中,那么代理规则和本地 SS 代理地址是写在一起的:

# / 代表匹配全部 URL,即全局代理
forward-socks5 / 127.0.0.1:1081 .
复制代码

# 根据规则自动代理
forward-socks5 .google.com 127.0.0.1:1081 .
复制代码

注意!每行最后还有一个点。

实现全局代理就是第一种写法了。

但是如果要自动代理,第二种直接写在配置文件里的做法其实不太合适,更合适的做法是写成 action 文件,配置文件中只管引用。

把上面的注释掉。
新建 action 文件 my.action,内容如下:

# 这一行表示本 action 文件中所有条目都使用代理
{+forward-override{forward-socks5 127.0.0.1:1081 .}}
# 添加一条规则
.google.com
复制代码

把 privoxy 转换后的地址 http://127.0.0.1:8118 添加到环境变量,可以参照 polipo 部分。

启动 privoxy,这时应该可以正常访问 Google 了:

service privoxy start
curl www.google.com
复制代码

下面看一下怎么用 gfwlist 生成 action 文件。

生成 action 文件

配置文件 config 或 action 文件修改后不需要重启 privoxy。

使用的工具是 gfwlist2privoxy。这个工具很简单,文档就几行,写得也很清楚。

安装:

pip install gfwlist2privoxy
复制代码

gfwlist2privoxy 不支持 python3.x,安装时注意使用的是 pip2 还是 pip3

参数说明:

  • -i/--input 输入,本地 gfwlist 文件或文件 URL。这里使用上面的 gfwlist
  • -f/ --file 输出,即生成的 action 文件的目录。这里输出到 /etc/privoxy/gfwlist.action
  • -p/ --proxy SS 代理地址,生成后可以修改。这里是 127.0.0.1:1081
  • -t/ --type 代理类型,生成后也可以修改。这里是 socks5
  • --user-rule 用户自定义规则文件,这个文件中的规则会被追加到 gfwlist 生成的规则后面

示例:

gfwlist2privoxy -i https://raw.githubusercontent.com/gfwlist/gfwlist/master/gfwlist.txt -f /etc/privoxy/gfwlist.action -p 127.0.0.1:1081 -t socks5
复制代码

得到文件 /etc/privoxy/gfwlist.action

# gfwlist.action generated by gfwlist2privoxy, 2018-08-02 07:36:00 +0000
# https://github.com/snachx/gfwlist2privoxy

{+forward-override{forward-socks5 127.0.0.1:1081 .}}

# 规则列表
...
复制代码

最后,把 /etc/privoxy/config 中的 actionsfile my.action 改为 actionsfile gfwlist.action 就完成了。

其他

  1. 还有一种自动代理的方法使用了 cow,还没试过。
  2. 环境变量的配置
    很多教程都只添加了 http_proxy 一项,但是实际使用中发现也需要设置 https_proxy。另外,关于地址的写法,只写 127.0.0.1:8123 时,遇到过有软件不能识别的情况,改为写完整的地址 http://127.0.0.1:8123/ 就不会有问题了。

Linu下ssr的安装和使用

u22e阅读(2077)

引子

也许是使用Linux的大佬都不屑于写这么简单的教程吧,所以关于如何在Linux上安装使用ssr客户端的教程比较少又比较模糊。

所以我就来写这个教程吧,同时因为Linux克隆GitHub的仓库奇慢并且可能会出现超时的情况(在此感谢GFW),文中及脚本的Git仓库均位于我自己搭建的gogs

安装

首先确认一下自己自己安装了Git。

ubuntu

sudo apt-get install git

Centos

sudo yum install git

然后在具有写权限的目录执行如下命令获取到ssr脚本仓库

git clone http://git.mrwang.pw/Reed/Linux_ssr_script.git

进入刚刚克隆的仓库目录并赋予ssr脚本执行权限

cd Linux_ssr_script && chmod +x ./ssr

然后将脚本放入可执行脚本的目录

sudo mv ./ssr /usr/local/sbin/

这样就完成了脚本的安装

使用

输入ssr,便会有如下的提示:

ShadowSocksR python client tool
if you have not installed ssr, run `ssr install` first
Usage:
	 ssr help

 Install/Uninstall
	 ssr install      install shadowsocksr client
	 ssr uninstall    uninstall shadowsocksr client

 Config and Subscribe
	 ssr update       update subscription from http://ss.pythonic.life
	 ssr config       edit config.json
	 ssr xclip        paste configs from clipboard to config.json

 Start/Stop/Restart
	 ssr start        start the shadowsocks service
	 ssr stop         stop the shadowsocks service
	 ssr restart      restart the shadowsocks service

 Testing and Maintenance
	 ssr test         get ip from cip.cc using socks5 proxy
	 ssr log          cat the log of shadowsocks
	 ssr shell        cd into ssr installation dir
	 ssr clean        clean ssr configuration backups

我们是第一次使用,所以首先执行

ssr install 

脚本它会下载ssr客户端并移动到合适的位置,现在我们来编辑配置文件

ssr config

在里面输入你的节点连接信息,然后保存。

启动

现在,来启动ssr进行哲学上网吧!

ssr start

关闭

关闭ssr可以输入

ssr stop

MAC OS 下路由的添加和删除

u22e阅读(2634)

vpn连接上网络不通,正常就是默认路由走的不对

添加路由

sudo route -n add -net 192.168.0.0(需进入的网段) -netmask 255.255.255.0 (掩码)192.168.5.254 (进该网段的网关)

这只是静态添加,不算永久,重启后应该会消失。

路由删除

sudo route -v delete -net 10.10.12.0(某网段) -gateway 10.10.12.1(某网关)

路由查看

为了看下添加和删除的效果,直接用netstat -r命令


负载均衡群集Keeplived+LVS安装和部署

u22e阅读(854)

简介:在互联网应用中,随着站点对硬件性能、响应速度、服务器的稳定性、数据的可靠性等要求越来越高。在访问量比较大的情况下,单台服务器已经不堪重负。除了使用昂贵的大型机和负载分流设备以外,企业还可以用另一种解决办法。那就是搭建负载均衡群集—通过整合多台廉价的普通服务器,以同一个地址对外提供相同的服务。

接下来由毛毛为大家讲解下企业中最常见的群集技术—-LVS(Linux Virtual Server,Linux虚拟服务器)。

1.群集的类型

负载均衡群集:为了提高系统的响应能力,尽可能处理更多访问请求,减少延迟,为目标提供高并发,高负载的整体性能。实现方法就是将来自客户端的请求,分担给多个服务器节点,从而缓解整个系统的负载压力。如:DNS轮询、反向代理等。

高可用群集:尽可能的减少故障的中断时间,确保服务的连续运行。例如:故障切换、双机热备、多机热备等都属于高可用群集技术。

高性能高运算群集:用来提高CPU运算速度扩展硬件资源和分析能力为目的。例如:云计算。网格计算等。

2.负载均衡的分层结构

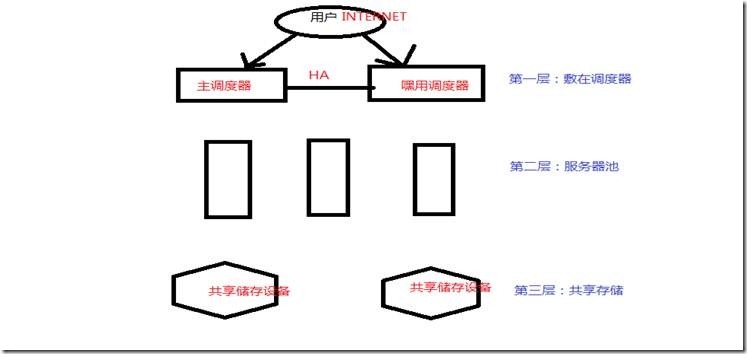
第一层:负载调度器:访问群集的唯一入口,对外使用VIP(虚拟IP),也成为群集IP。一般都有两台服务器,为防止单点故障。

第二层:服务器池:为群集提供真实的应用服务(HTTP、FTP等)。只处理敷在调度器分发过来的客户请求。当某一节点有故障时,如在调度器会将其隔离。等待错误排除后再重新纳入服务器池。

第三层:共享储存:为服务器池中的所有节点提供稳定、一致的文件存取服务。确保群集内容的统一性。也就是说让所有服务器的文件都是一样的。

3.负载均衡的调度算法。

前面我们知道了。第一层负载调度器会将客户的请求分配给第三层的服务器池里的节点服务器。但是它是根据什么分配的呢?下面我就讲解下常用的LVS的负载调度算法。

l 轮询(rr):负载调度器收到的请求按照顺序分配给给节点服务器。均等对待每一台节点服务器。

l 加权轮询(wrr):根据真实的服务器的处理能力去分配收到的访问请求。调度器会自动查询各节点的负载情况,并自动调整权重。

l 最少连接(lc):根据真实服务器已经建立的连接数进行分配,将受到请求最先给连接数较少的节点服务器,在服务器性能基本一致情况下可以选择此算法。

l 加权最少连接数(wlc):在服务器节点性能差异大的情况下,负载调度器可以自动调整服务器权重。权重较高的服务器将承担跟大的客户请求。

4.负载均衡的三种模式

  • 地址转换:简称NAT模式。就是负载调度器作为所有服务器的网关。即是客户访问的入口,也是服务器回应客户访问的出口。
  • IP隧道:简称TUN模式。开放式网络结构。服务器全部都是直接连接公网。

调度器作为客户访问入口。各节点服务器直接从公网上回复客户。不经过调度器。

  •  直接路由:简称DR模式。跟TUN类似。但是各节点不是分散在各地。而是集中在同一网络结构中。

项目环境:

主调度器:192.168.1.129

备用调度器:192.168.1.128

节点一:192.168.1.130

节点二:192.168.1.131

第一层调度器设置


1. 安装ipvsadm管理工具


Ipvsadm是负载调度器上的lvs群集管理工具。通过ip_vs模块添加,删除服务器节点,以及查看群集的状态。


2. 安装keepalived


在安装keepalived前。先安装依赖包。除此之外,LVS集群环境中也要用到ipvsadm上面已经安装过了。


如果是编译安装(make ,make install)那么要将keepalived添加为系统服务。


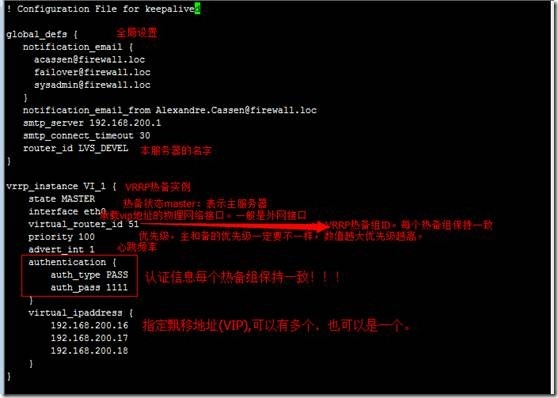
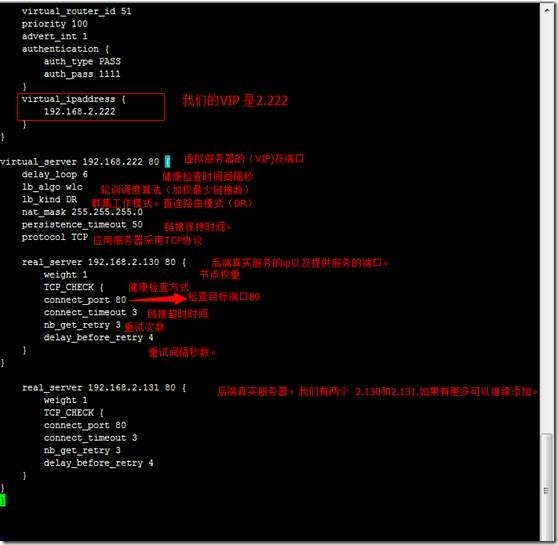
3. 主调度器配置 纠错:主从调度器都是192.168.1网段。图片有误。


启动服务器


用ip a查看看到VIP绑定在网络接口上,说明配置成功。从调度器是没有的。


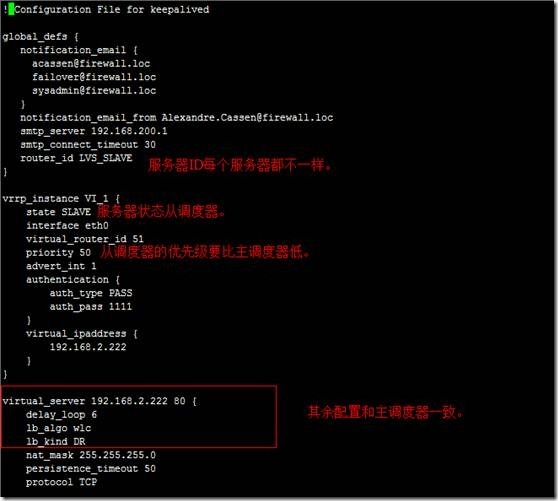
4. 设置从调度器


从调度器和主调度器配置基本相同。现在只需要调整router_id,state,priority参数即可。配置完成后重启keepalived。


第二层服务器池设置 :网络节点一:192.168.1.130 节点二:192.168.1.131的设置


5. 配置各个节点服务器


根据选择的群集模式不同DR/NAT,节点服务器的配置也有差异。以DR为例,除了要调整/proc系统的ARP响应参数意外,还要为虚拟接口lo:0配置VIP配置。并添加一条道VIP的本地路由。

vi /etc/rc.d/init.d/realserver #编辑,添加以下代码

#################################################

#!/bin/sh

# chkconfig: – 80 90

# description:realserver

# httpd_vip start realserver

httpd_vip=192.168.21.254 #LVS虚拟服务器(VIP)

. /etc/rc.d/init.d/functions

case “$1” in

start)

ifconfig lo:0 $httpd_vip netmask 255.255.255.255 broadcast $httpd_vip

/sbin/route add -host $httpd_vip dev lo:0

echo “1” >/proc/sys/net/ipv4/conf/lo/arp_ignore

echo “2” >/proc/sys/net/ipv4/conf/lo/arp_announce

echo “1” >/proc/sys/net/ipv4/conf/all/arp_ignore

echo “2” >/proc/sys/net/ipv4/conf/all/arp_announce

sysctl -p >/dev/null 2>&1

echo “RealServer Start OK”

;;

stop)

ifconfig lo:0 down

route del $httpd_vip >/dev/null 2>&1

echo “0” >/proc/sys/net/ipv4/conf/lo/arp_ignore

echo “0” >/proc/sys/net/ipv4/conf/lo/arp_announce

echo “0” >/proc/sys/net/ipv4/conf/all/arp_ignore

echo “0” >/proc/sys/net/ipv4/conf/all/arp_announce

echo “RealServer Stoped”

;;

*)

echo “Usage: $0 {start|stop}”

exit 1

esac

exit 0

#################################################

chmod +x /etc/rc.d/init.d/realserver #添加脚本执行权限

chkconfig realserver on #添加开机启动

/etc/rc.d/init.d/realserver start #开启,参数stop为关闭

5.2调整节点服务器参数,使LVS虚拟服务器(VIP)忽略ARP广播包

vi /etc/sysctl.conf #编辑

net.ipv4.ip_forward= 1 #修改0为1,开启转发

net.ipv4.conf.lo.arp_ignore= 1

net.ipv4.conf.lo.arp_announce= 2

net.ipv4.conf.all.arp_ignore= 1

net.ipv4.conf.all.arp_announce= 2

:wq! #保存退出

/sbin/sysctl -p #使配置立即生效


6. 验证结果


在主从调度器上查看各节点是否加入LVS


在节点服务器的网站根目录下创建测试网页。


关闭192.168.1.130节点服务器。网站内容跳转到192.168.1.131上。说明LVS搭建成功。Keepalived稍后测试。


现在关闭192.168.1.130节点。再次访问192.168.1.222


这时在查看lvs中的节点服务器。发现192.168.1.130这个故障机器已经被隔离。这剩下正常服务器131。当130恢复正常后lvs会将它自动加入lvs服务器池中。


接下来测试keeplived是否搭建成功。

首先关闭主节点服务器192.168.1.129看是否还可以正常访问192.168.1.222那么keeplived搭建成功。如果不成功请检查以上所有步骤。


7.共享储存这个用NFS比较简单。大家查阅资料即可。这里就不说了。

linux下SVN版本管理部署与代码上线架构方案

u22e阅读(1195)

SVN是Subversion的简称,是一个开放源代码的版本控制系统,可以超越时间的管理文件和目录。文件保存在中央版本库,除了能记住文件和目录的每次修改以外,版本库非常像普通的文件服务器。你可以将文件恢复到过去的版本,并且可以通过检查历史知道数据做了哪些修改,谁做的修改。这就是为什么许多人将 Subversion 和版本控制系统看作一种“时间机器”。说得简单一点SVN就是用于多个人共同开发同一个项目,共用资源的目的。

svn与git的区别
svn
svn版本控制系统是集中式的数据管理,存在一个中央版本库。所有开发人员本地开发使用的代码都是来自这个版本库,提交代码也都必须提交到这个中央版本库。
svn工作流程:
1、在中央版本库中创建一个项目,项目中包含主干和分支,分支是从主干复制的;
2、开发人员从中央版本库check out下这个分支的代码;
3、增加自己的代码、修改或删除现存的代码;
4、commit 代码,如果修改期间其他人提交了代码,就会提示过期无法提交,就需要先up,之后再提交;如果up代码时出现冲突,就需要解决冲突之后在提交(开发人员协商解决冲突);
5、测试环境测试,解决问题之后合并到主干中,在之后更新生产环境代码;
缺点:
1、严重依赖网络环境,连接不到中央版本库时无法工作;
2、需要备份——–>需要备份数据和修改的历史记录

git
git是分布式版本控制系统,没有中央版本库的说法,和svn不同的是,开发者本地有一个完整的git仓库,但是实际使用中需要建立一个远程的git仓库,以方便共享代码和版本控制;
git工作流程:
1、本地创建一个git库,并将其add到远程git库中;
2、在本地添加、删除、修改文件,然后commit,此时commit是提交到本地git仓库中;
3、将本地git库分支push到远程git库的分支,如果此时远程已经有别人push过,那远程git将不允许你push,必须先pull。并解决冲突之后才能在push到远程git库;
优点:
1、开发时不依赖网络,随时commit到本地,和随时查看修改历史,只有在合并代码时才需要连接远程git仓库;
2、svn还是主流,git正在发展,将来会成为主流,都掌握会更好;

svn运维人员需要掌握的程度:
1、安装、部署、维护、排障;
2、简单使用,很多公司都是有开发来管理,包括建立仓库和添加删除账号。
3、对于版本控制系统—->运维相当于开发商,开发人员是业主,运维搭建的系统为开发人员服务。

svn之运行方式和访问方式:
服务端运行方式:
1、独立服务器访问:(svn://svn.etiantian.org/www/)
2、和apache等http服务结合:(http://svn.etiantian.org/www/)
a、单独安装apache+svn;
b、csvn()是一个整合好的一体软件,带有web管理页面的svn软件;
3、本地直接访问:(file://application/data/www/)
客户端访问方式:
访问方式                说明
file://            直接访问本地磁盘或网络磁盘访问版本库
http://           通过webdav协议访问支持subversion的apache服务器
https://         与http://类似,只是用了ssl加密访问
svn://            通过TCP/IP自定义协议访问subversion服务器
svn+ssh://    通过认证并加密的TCP/IP自定义协议访问subversion服务器

SVN中的一些概念 :
(1). repository(源代码库)
源代码统一存放的地方
(2). Checkout (提取)
当你手上没有源代码的时候,你需要从repository checkout一份
(3). Commit (提交)
当你已经修改了代码,你就需要Commit到repository
(4). Update (更新)
      当你已经Checkout了一份源代码, Update一下你就可以和Repository上的源代码同步,你手上的代码就会有最新的变更。

安装配置SVN服务:
[root@moban ~]# cat /etc/redhat-release
CentOS release 6.8 (Final)
[root@moban ~]# uname -r
2.6.32-642.el6.x86_64
[root@moban ~]# rpm -qa subversion
[root@moban ~]# yum -y install subversion
[root@moban ~]# sed -i ‘s/keepcache=0/keepcache=1/g’ /etc/yum.conf
[root@moban ~]# grep “keepcache” /etc/yum.conf
keepcache=1  //rpm包下载安装后不清除
[root@moban ~]# mkdir -p /application/svndata <==数据存储的根目录
[root@moban ~]# mkdir -p /application/svnpasswd <==用户及密码和权限目录
[root@moban ~]# svn
svn            svnlook        svnversion
svnadmin       svnserve
svndumpfilter  svnsync
[root@moban ~]# svnserve –help
usage: svnserve [-d | -i | -t | -X] [options]
Valid options:
-d [–daemon] //以守护进程的方式运行 : daemon mode
-r [–root] ARG //指定存储的根目录   : root of directory to serve
其它剩余参数省略。。。。。。
[root@moban ~]# svnserve -d -r /application/svndata/ #启动SVN服务并指定数据存储的根目录
[root@moban ~]# ps -ef| grep svn|grep -v grep
root       8554      1  0 23:48 ?        00:00:00 svnserve -d -r /application/svndata/
[root@moban ~]# netstat -tunlp|grep svn
tcp        0      0 0.0.0.0:3690                0.0.0.0:*                   LISTEN      8554/svnserve
[root@moban ~]# lsof -i:3690
COMMAND   PID USER   FD   TYPE DEVICE SIZE/OFF NODE NAME
svnserve 8554 root    3u  IPv4  20242      0t0  TCP *:svn (LISTEN)

创建项目版本库:
[root@moban ~]# svnadmin –help
general usage: svnadmin SUBCOMMAND REPOS_PATH  [ARGS & OPTIONS …]
Type ‘svnadmin help <subcommand>’ for help on a specific subcommand.
Type ‘svnadmin –version’ to see the program version and FS modules.
Available subcommands:
crashtest
create
deltify
dump
help (?, h)
hotcopy
list-dblogs
list-unused-dblogs
load
lslocks
lstxns
pack
recover
rmlocks
rmtxns
setlog
setrevprop
setuuid
upgrade
verify
[root@moban ~]# svnadmin help create
create: usage: svnadmin create REPOS_PATH
Create a new, empty repository at REPOS_PATH.
Valid options:
–bdb-txn-nosync         : disable fsync at transaction commit [Berkeley DB]
–bdb-log-keep           : disable automatic log file removal [Berkeley DB]
–config-dir ARG         : read user configuration files from directory ARG
–fs-type ARG            : type of repository: ‘fsfs’ (default) or ‘bdb’
–pre-1.4-compatible     : use format compatible with Subversion versions
earlier than 1.4
–pre-1.5-compatible     : use format compatible with Subversion versions
earlier than 1.5
–pre-1.6-compatible     : use format compatible with Subversion versions
earlier than 1.6
[root@moban ~]# svnadmin create /application/svndata/sadoc
[root@moban ~]# ll /application/svndata/
total 4
drwxr-xr-x. 6 root root 4096 Oct 26 23:58 sadoc
[root@moban ~]# tree /application/svndata/
/application/svndata/
└── sadoc
├── conf
│   ├── authz
│   ├── passwd
│   └── svnserve.conf
├── db
│   ├── current
│   ├── format
│   ├── fsfs.conf
│   ├── fs-type
│   ├── min-unpacked-rev
│   ├── rep-cache.db
│   ├── revprops
│   │   └── 0
│   │       └── 0
│   ├── revs
│   │   └── 0
│   │       └── 0
│   ├── transactions
│   ├── txn-current
│   ├── txn-current-lock
│   ├── txn-protorevs
│   ├── uuid
│   └── write-lock
├── format
├── hooks
│   ├── post-commit.tmpl
│   ├── post-lock.tmpl
│   ├── post-revprop-change.tmpl
│   ├── post-unlock.tmpl
│   ├── pre-commit.tmpl
│   ├── pre-lock.tmpl
│   ├── pre-revprop-change.tmpl
│   ├── pre-unlock.tmpl
│   └── start-commit.tmpl
├── locks
│   ├── db.lock
│   └── db-logs.lock
└── README.txt


调整svn配置文件及权限文件:
[root@moban ~]# cd /application/svndata/sadoc/conf/
[root@moban conf]# cp svnserve.conf svnserve.conf.bak
[root@moban conf]# grep “^[a-Z]” /application/svndata/sadoc/conf/svnserve.conf
anon-access = none
auth-access = write
password-db = /application/svnpasswd/passwd
authz-db = /application/svnpasswd/authz
[root@moban conf]# diff svnserve.conf.bak svnserve.conf
12,13c12,13
< # anon-access = read  //匿名用户访问权限
< # auth-access = write  //认证用户访问权限

> anon-access = none
> auth-access = write
20c20
< # password-db = passwd  //密码认证文件

> password-db = /application/svnpasswd/passwd
27c27
< # authz-db = authz

> authz-db = /application/svnpasswd/authz  //权限配置数据文件
[root@moban conf]# egrep “\-access|\-db =” svnserve.conf
anon-access = none
auth-access = write
password-db = /application/svnpasswd/passwd
authz-db = /application/svnpasswd/authz
[root@moban conf]# ls
authz  passwd  svnserve.conf  svnserve.conf.bak
[root@moban conf]# cp authz passwd /application/svnpasswd/
[root@moban conf]# ll /application/svnpasswd/
total 8
-rw-r–r–. 1 root root 1080 Oct 27 00:29 authz
-rw-r–r–. 1 root root  309 Oct 27 00:29 passwd
[root@moban conf]# cd /application/svnpasswd/
[root@moban svnpasswd]# ll
total 8
-rw-r–r–. 1 root root 1080 Oct 27 00:29 authz
-rw-r–r–. 1 root root  309 Oct 27 00:29 passwd
[root@moban svnpasswd]# chmod 700 *  //修改密码文件(passwd)、权限配置文件(authz)的文件权限为700,提高安全。安全无小事,但是,重视的运维却少的可怜。
[root@moban svnpasswd]# ll
total 8
-rwx——. 1 root root 1080 Oct 27 00:29 authz
-rwx——. 1 root root  309 Oct 27 00:29 passwd
[root@moban svnpasswd]# vi passwd
[users]
# harry = harryssecret
# sally = sallyssecret
linuxzkq = 123456   //添加用户与密码,注意必须在[users]标签下添加。
guest = guest   //添加用户与密码,等号前面是用户名,后面是密码。

提示:更改svnserve.conf文件时,需要重启svn,更改passwd、authz文件时不需要重启。
[root@moban svnpasswd]# vi authz
在最下面添加配置权限如下:
[groups]
linux = linuxzkq,guest  //定义用户组及所包含的用户,其中,1个用户组可以包含1个或多个用户,用户间以逗号分隔。
[sadoc:/]
linuxzkq = rw   //用户访问权限
guest = r
@linux = r   //用户组访问权限
* =   //* = 表示,除了linuxzkq、guest用户、linux用户组,任何人都被禁止访问版本库
注意:
权限配置文件中出现的用户名必须已在用户配置文件中定义。

用户组格式:
[groups]
= ,
其中,1个用户组可以包含1个或多个用户,用户间以逗号分隔。

版本库目录格式:
[<版本库>:/项目/目录]
@<用户组名> = <权限>
<用户名> = <权限>
其中,方框号内部分可以有多种写法:
[/],表示根目录及以下,根目录是svnserve启动时指定的,[/]就是表示对全部版本库设置权限。
权限主体可以是用户组、用户或*,用户组在前面加@
权限可以是w、r、wr和空,空表示没有任何权限。

重启svn命令<非必需>:
kill -USR1 `cat /application/svndata/svn.pid`
svnserve -d -r /application/svndata/ –pid-file=/application/svndata/svn.pid
[root@moban svnpasswd]# pkill svnserve
[root@moban svnpasswd]# svnserve -d -r /application/svndata/ –pid-file=/application/svndata/svn.pid

客户端软件windows安装使用:
windows 64位的话下载:TortoiseSVN-1.7.6.22632-x64-svn-1.7.4.msi
windows 32位的话下载:TortoiseSVN-1.6.5.16974-win32-svn-1.6.5.msi
具体的下载文件可以在网上下载下,一找一大堆
通过客户端进行访问,地址如下:
svn://{your-server-ip}/sadoc
用户名:guest
密码:guest

linux下Svn客户端命令的使用:
[root@moban ~]# svn –help
usage: svn <subcommand> [options] [args]
Subversion command-line client, version 1.6.11.
Type ‘svn help <subcommand>’ for help on a specific subcommand.
Type ‘svn –version’ to see the program version and RA modules
or ‘svn –version –quiet’ to see just the version number.
Most subcommands take file and/or directory arguments, recursing
on the directories.  If no arguments are supplied to such a command, it recurses on the current directory (inclusive) by default.
Available subcommands:
add
blame (praise, annotate, ann)
cat
changelist (cl)
checkout (co)  //从源码库提取一个工作版本的拷贝,常用的
cleanup
commit (ci)  //提交当前工作拷贝的更改。这个地方是有可能出现代码冲突的。常用的
copy (cp)  //做一个工作拷贝的拷贝
delete (del, remove, rm)  //删除本地或者svn server response上的文件或目录
diff (di)  //比较某个文件与库中的对应文件的不同,类似于系统的diff命令。
export  //导出一个无版本控制的目录树拷贝。一般用于导出发行,或者投入运行的版本
help (?, h)
import  //将本地当前目录下的文件导入到svn response中。
info  //当前目录工作拷贝中某文件信息,如URL,版本,修改日期等。
list (ls)  //列出当前工作拷贝下的文件,相当于系统ls命令。
lock
log
merge  //将两个来源之间的差异应用到工作拷贝路径。
mergeinfo
mkdir  //在本地或者svn reponse上新建一个文件夹。
move (mv, rename, ren)
propdel (pdel, pd)
propedit (pedit, pe)
propget (pget, pg)
proplist (plist, pl)
propset (pset, ps)
resolve
resolved
revert
status (stat, st)  //svn工作拷贝当前状态,与svn server上的源码比较的结果。
switch (sw)
unlock
update (up)  //将svn server端文件同步到本地,常用的。
Subversion is a tool for version control.
For additional information, see http://subversion.tigris.org/
[root@c6 ~]# mkdir /svndata
[root@c6 ~]# svn co svn://192.168.0.111/sadoc/ /svndata/ –username=guest –password=guest
———————————————————————–
ATTENTION!  Your password for authentication realm:
<svn://192.168.0.111:3690> 10073e1b-bf6e-4d4c-b01f-1358a1a9a561
can only be stored to disk unencrypted!  You are advised to configure
your system so that Subversion can store passwords encrypted, if
possible.  See the documentation for details.
You can avoid future appearances of this warning by setting the value
of the ‘store-plaintext-passwords’ option to either ‘yes’ or ‘no’ in
‘/root/.subversion/servers’.
———————————————————————–
Store password unencrypted (yes/no)? yes
A    /svndata/22.txt
Checked out revision 1.
[root@c6 ~]# ll /svndata/
total 0
-rw-r–r–. 1 root root 0 Oct 27 23:41 22.txt
[root@c6 ~]#  svn up svn://192.168.0.111/sadoc/ /svndata/ –username=guest –password=guest
Skipped ‘svn://192.168.0.111/sadoc’
A    /svndata/33.bmp
Updated to revision 2.
Summary of conflicts:
Skipped paths: 1
[root@c6 ~]# ll /svndata/
total 0
-rw-r–r–. 1 root root 0 Oct 27 23:41 22.txt
-rw-r–r–. 1 root root 0 Oct 27 23:49 33.bmp
[root@c6 ~]#  svn up svn://192.168.0.111/sadoc/ /svndata/ –username=guest –password=guest
Skipped ‘svn://192.168.0.111/sadoc’
A    /svndata/22
Updated to revision 3.
Summary of conflicts:
Skipped paths: 1
[root@c6 ~]# ll /svndata/
total 4
drwxr-xr-x. 3 root root 4096 Oct 27 23:51 22
-rw-r–r–. 1 root root    0 Oct 27 23:41 22.txt
-rw-r–r–. 1 root root    0 Oct 27 23:49 33.bmp
[root@c6 ~]#  svn co svn://192.168.0.111/sadoc/ /svndata/ –username=guest –password=guest
A    /svndata/666.txt
Checked out revision 4.
[root@c6 ~]# ll /svndata/
total 4
drwxr-xr-x. 3 root root 4096 Oct 27 23:51 22
-rw-r–r–. 1 root root    0 Oct 27 23:41 22.txt
-rw-r–r–. 1 root root    0 Oct 27 23:49 33.bmp
-rw-r–r–. 1 root root    0 Oct 27 23:53 666.txt
[root@moban ~]# svn co file:///application/svndata/sadoc  //在服务端本地以文件的方式访问提取,文件提取只适用于服务端本地访问。
A    sadoc/666.txt
A    sadoc/22.txt
A    sadoc/33.bmp
A    sadoc/22
Checked out revision 4.
[root@c6 ~]# svn list svn://192.168.0.111/sadoc

22/
22.txt
33.bmp
666.txt
新建文本文档 (2).txt
新建文本文档.txt
[root@c6 ~]# touch /svndata/{a..d}
[root@c6 ~]# cd /svndata/
[root@c6 ~]# touch /svndata/{a..d}
[root@c6 svndata]# svn add  a b c d e f g
A         a
A         b
A         c
A         d
svn: warning: ‘e’ not found
svn: warning: ‘f’ not found
svn: warning: ‘g’ not found
[root@c6 svndata]# svn ci -m “svn ci data” /svndata/ –username=linuxzkq –password=123456
———————————————————————–
ATTENTION!  Your password for authentication realm:
<svn://192.168.0.111:3690> 10073e1b-bf6e-4d4c-b01f-1358a1a9a561
can only be stored to disk unencrypted!  You are advised to configure
your system so that Subversion can store passwords encrypted, if
possible.  See the documentation for details.
You can avoid future appearances of this warning by setting the value
of the ‘store-plaintext-passwords’ option to either ‘yes’ or ‘no’ in
‘/root/.subversion/servers’.
———————————————————————–
Store password unencrypted (yes/no)? yes
Adding         a
Adding         b
Adding         c
Adding         d
Transmitting file data ….
Committed revision 7.
[root@c6 svndata]#  svn ci -m “svn ci data” /svndata/
Adding         {rr..tt}.txt
Transmitting file data .
Committed revision 8.
[root@c6 svndata]# svn list svn://192.168.0.111/sadoc
22/
22.txt
33.bmp
666.txt
a
b
c
d
{rr..tt}.txt
新建文本文档 (2).txt
新建文本文档.txt
[root@c6 svndata]# svn up svn://192.168.0.111/sadoc /svndata
Skipped ‘svn://192.168.0.111/sadoc’
D    /svndata/新建文本文档 (2).txt
A    /svndata/新建 Microsoft Excel 工作表.xlsx
Updated to revision 9.
Summary of conflicts:
Skipped paths: 1
[root@c6 svndata]# ll
total 12
drwxr-xr-x. 3 root root 4096 Oct 28 00:40 22
-rw-r–r–. 1 root root    0 Oct 27 23:41 22.txt
-rw-r–r–. 1 root root    0 Oct 27 23:49 33.bmp
-rw-r–r–. 1 root root    0 Oct 27 23:53 666.txt
-rw-r–r–. 1 root root    0 Oct 28 00:35 a
-rw-r–r–. 1 root root    0 Oct 28 00:35 b
-rw-r–r–. 1 root root    0 Oct 28 00:35 c
-rw-r–r–. 1 root root    0 Oct 28 00:35 d
-rw-r–r–. 1 root root    0 Oct 28 00:45 {rr..tt}.txt
-rw-r–r–. 1 root root 6327 Oct 28 00:54 新建 Microsoft Excel 工作表.xlsx
-rw-r–r–. 1 root root    0 Oct 28 00:03 新建文本文档.txt
[root@c6 svndata]# svn up svn://192.168.0.111/sadoc /svndata
Skipped ‘svn://192.168.0.111/sadoc’
D    /svndata/22
D    /svndata/新建 Microsoft Excel 工作表.xlsx
D    /svndata/{rr..tt}.txt
A    /svndata/888l.xlsx
Updated to revision 10.
Summary of conflicts:
Skipped paths: 1
[root@c6 svndata]# svn up /svndata

D    /svndata/新建文本文档.txt
A    /svndata/777.txt
Updated to revision 11.
[root@c6 svndata]# ll
total 8
-rw-r–r–. 1 root root    0 Oct 27 23:41 22.txt
-rw-r–r–. 1 root root    0 Oct 27 23:49 33.bmp
-rw-r–r–. 1 root root    0 Oct 27 23:53 666.txt
-rw-r–r–. 1 root root    0 Oct 28 00:58 777.txt
-rw-r–r–. 1 root root 6327 Oct 28 00:56 888l.xlsx
-rw-r–r–. 1 root root    0 Oct 28 00:35 a
-rw-r–r–. 1 root root    0 Oct 28 00:35 b
-rw-r–r–. 1 root root    0 Oct 28 00:35 c
-rw-r–r–. 1 root root    0 Oct 28 00:35 d
[root@c6 svndata]# svn help copy
copy (cp): Duplicate something in working copy or repository, remembering
history.
usage: copy SRC[@REV]… DST
When copying multiple sources, they will be added as children of DST,
which must be a directory.
SRC and DST can each be either a working copy (WC) path or URL:
WC  -> WC:   copy and schedule for addition (with history)
WC  -> URL:  immediately commit a copy of WC to URL
URL -> WC:   check out URL into WC, schedule for addition
URL -> URL:  complete server-side copy;  used to branch and tag
All the SRCs must be of the same type.
WARNING: For compatibility with previous versions of Subversion,
copies performed using two working copy paths (WC -> WC) will not
contact the repository.  As such, they may not, by default, be able
to propagate merge tracking information from the source of the copy
to the destination.
Valid options:
-r [–revision] ARG      : ARG (some commands also take ARG1:ARG2 range)
A revision argument can be one of:
NUMBER       revision number
‘{‘ DATE ‘}’ revision at start of the date
‘HEAD’       latest in repository
‘BASE’       base rev of item’s working copy
‘COMMITTED’  last commit at or before BASE
‘PREV’       revision just before COMMITTED
-q [–quiet]             : print nothing, or only summary information
–ignore-externals       : ignore externals definitions
–parents                : make intermediate directories
-m [–message] ARG       : specify log message ARG
-F [–file] ARG          : read log message from file ARG
–force-log              : force validity of log message source
–editor-cmd ARG         : use ARG as external editor
–encoding ARG           : treat value as being in charset encoding ARG
–with-revprop ARG       : set revision property ARG in new revision
using the name[=value] format
Global options:

–username ARG      : specify a username ARG
–password ARG       : specify a password ARG
–no-auth-cache      : do not cache authentication tokens
–non-interactive      : do no interactive prompting
–trust-server-cert    : accept unknown SSL server certificates without
prompting (but only with ‘–non-interactive’)
–config-dir ARG         : read user configuration files from directory ARG
–config-option ARG   : set user configuration option in the format:
FILE:SECTION:OPTION=[VALUE]

For example:

servers:global:http-library=serf

svn钩子:
钩子脚本的具体写法就是操作系统中shell脚本程序的写法,可根据自己的SVN所在的操作系统和shell程序进行相应的开发。
钩子脚本就是被某些版本库事件触发的程序,例如:创建新版本或修改未被版本控制的属性。每个钩子都能掌管足够的信息来了解发生了什么事件,操作对像是什么以及触发事件用户的账号。类似inotify或sersync。
通过钩子的输出或返回状态,钩子程序能让该动作继续执行、停止或是以某种方式挂起。
默认情况下,钩子的子目录中包含各种版本库钩子模板。如下:
[root@moban ~]# tree /application/svndata/sadoc/hooks/
/application/svndata/sadoc/hooks/
├── post-commit.tmpl  //提交的
├── post-lock.tmpl  //上(加)锁的
├── post-revprop-change.tmpl
├── post-unlock.tmpl  //解锁的
├── pre-commit.tmpl  //预提交的
├── pre-lock.tmpl   //预上锁的
├── pre-revprop-change.tmpl
├── pre-unlock.tmpl  //预解锁的
└── start-commit.tmpl  //开始提交的
0 directories, 9 files
对每种Subversion版本库支持的钩子都有一个模板,通过查看这些脚本的内容,你能看到是什么事件触发了脚本及如何传脚本,传递数据。
要实际安装一个可用的钩子,你需要在 repos/hooks目录下安装一些与钩子同名(如 start-commit或者post-commit)的可执行程序或脚本。注意:去掉模板的扩展名。
重要提示:
由于安全原因,Subversion版本库在一个空环境中执行钩子脚本—就是没有任何环境变量,甚至没有$PATH或%PATH%。由于这个原因,许多管理员会感到很困惑,它们的钩子脚本手工运行时正常,可在Subversion中却不能运行。要注意,必须在你的钩子中设置好环境变量或为你的程序指定好绝对径。

常用钩子脚本:
1.post-commit
在提交成功完成、创建版本之后执行该钩子,提交已经完成,不可更改。因此,本脚本的返回值被忽略。提交完成时触发事务。
2.pre-commit
提交完成前触发执行该脚本。
3.start-commit
在客户端还没有向服务器提交数据之前,即还没有建立Subversion transaction(缩写为txn)之前,执行该脚本(提交前触发事务)

svn钩子生产应用场景举例:
pre-commit
1.限制上传文件扩展名及大小,控制提交要输入的信息等。

post-commit
2.SVN更新自动通知,MSN,邮件或短信通知。
3.SVN更新触发checkout程序,然后实时rsync推送到服务器等。

svn钩子生产应用实战:
一、rsync与svn钩子结合实现数据实时同步(某企业小案例)
1.建立同步web目录
mkdir /data/www
[root@c6 ~]# mkdir /data/www -p
[root@c6 ~]# ll /data/www/
total 0
2.将SVN中内容checkout到web目录一份。
[root@c6 ~]# svn co svn://192.168.0.111/sadoc /data/www –username=guest –password=guest
———————————————————————–
ATTENTION!  Your password for authentication realm:
<svn://192.168.0.111:3690> 10073e1b-bf6e-4d4c-b01f-1358a1a9a561
can only be stored to disk unencrypted!  You are advised to configure
your system so that Subversion can store passwords encrypted, if
possible.  See the documentation for details.
You can avoid future appearances of this warning by setting the value
of the ‘store-plaintext-passwords’ option to either ‘yes’ or ‘no’ in
‘/root/.subversion/servers’.
———————————————————————–
Store password unencrypted (yes/no)? yes
A    /data/www/666.txt
A    /data/www/888l.xlsx
A    /data/www/a
A    /data/www/22.txt
A    /data/www/b
A    /data/www/33.bmp
A    /data/www/777.txt
A    /data/www/c
A    /data/www/d
Checked out revision 11.
[root@c6 ~]# ll /data/www
total 8
-rw-r–r–. 1 root root    0 Oct 28 08:28 22.txt
-rw-r–r–. 1 root root    0 Oct 28 08:28 33.bmp
-rw-r–r–. 1 root root    0 Oct 28 08:28 666.txt
-rw-r–r–. 1 root root    0 Oct 28 08:28 777.txt
-rw-r–r–. 1 root root 6327 Oct 28 08:28 888l.xlsx
-rw-r–r–. 1 root root    0 Oct 28 08:28 a
-rw-r–r–. 1 root root    0 Oct 28 08:28 b
-rw-r–r–. 1 root root    0 Oct 28 08:28 c
-rw-r–r–. 1 root root    0 Oct 28 08:28 d
3.利用钩子同步程序到远程服务器
[root@moban ~]# cd  /application/svndata/sadoc/hooks
[root@moban hooks]# cp post-commit.tmpl post-commit
[root@moban hooks]# mv post-commit post-commit.ori
[root@moban hooks]# vi post-commit
创建svn钩子脚本(post-commit):
#!/bin/sh
#设定环境变量,如果没有设定可能会出现update报错

export LC_CTYPE=”en_US.UTF-8″
export LC_ALL=
REPOS=”$1″
REV=”$2″
SVN_PATH=”/usr/bin/svn”
WEB_PATH=”/data/www”
LOG_PATH=”/app/log”
RSYNC_PATH=”/usr/bin/rsync”

#/usr/bin/svn update –username user –password password $WEB_PATH –no-auth-cache
#echo “\n##############开始提交” `date “+%Y-%m-%d %H:%M:%S”` ‘##################’ >>$LOG_PATH
#echo `whoami`,$REPOS,$REV >>$LOG_PATH
[ ! -d ${LOG_PATH} ] && mkdir ${LOG_PATH} -p
#update content from svn
$SVN_PATH update –username linuxzkq –password 123456 $WEB_PATH >>$LOG_PATH/up_$(date +%F_%H:%M:%S).log 2>&1
if [ $? -eq 0 ]
then
$RSYNC_PATH -az –delete $WEB_PATH /tmp/
fi
[root@moban hooks]# chmod 700 post-commit
[root@moban hooks]# ll /tmp
total 0
-rw——-. 1 root root 0 Oct 26 21:56 yum.log
[root@moban hooks]# ll /tmp/www
total 16
-rw-r–r–. 1 root root    0 Oct 27 13:45 100.txt
-rw-r–r–. 1 root root    0 Oct 27 13:28 123.bmp
-rw-r–r–. 1 root root 6327 Oct 27 13:45 200.xlsx
-rw-r–r–. 1 root root    0 Oct 27 13:28 22.txt
-rw-r–r–. 1 root root    0 Oct 27 13:36 55.txt
-rw-r–r–. 1 root root    0 Oct 27 13:36 66.bmp
-rw-r–r–. 1 root root    0 Oct 27 13:34 7.txt
-rw-r–r–. 1 root root    0 Oct 27 13:42 8888.bmp
写svn钩子脚本的一些注意事项:
1.钩子脚本的权限要允许svn执行,一般可以设置chmod 700 post-commit。
2.写钩子脚本时要尽可能定义环境变量,主要是用过的命令的全路径。因为svn考虑安全问题,不会调用系统环境变量,所以如果发现手动执行post-commit没有问题,但SVN自动执行也可能会无法执行。
3.老男孩老师提供的案例脚本,在SVN update之前一定要先手动checkout一份出来,还有尽可能要加上用户名和密码,如果只是手动一样会更新,但自动触发可能就不能更新了。
4.加上了对前一个命令的判断,如果update的时候出了问题,程序没有退出的话还会继续同步代码到WEB服务器上,这样会造成代码有问题。
5.记得要设置所属用户,因为rsync可以同步文件属性,而且我们的WEB服务器一般都不是root用户,用户不正确会造成WEB程序无法正常工作。
6.建议最好记录日志,出错的时候可以很快的排错。
7.最后最关键的数据同步,rsync的相关参数一定要清楚,这个就不说了。注意几个场景:
场景一、如果目的WEB服务器为综合的混杂的,像只有一个WEB静态资源,用户提交的,自动生成的都在WEB的一个目录下,建议不要用–delete这个参数
上面这个程序就是这样,实现的是源服务器到目的服务器的更新和添加,而没有删除操作,WEB服务器的内容会多于源SVN的服务器的

场景二、实现镜像,即目的WEB服务器与源SVN服务器一样的数据,SVN上任何变化WEB上一样的变化,就需要–delete参数

场景三、不需要同步某些子目录,可能有些目录是缓存的临时垃圾目录,或者是专用的图片目录(而不是样式或者排版的)要用exclude这个参数

  注意:这个参数的使用不用写绝对路径,只要目录名称就行 aa代表文件 aa/ 代表目录 ,缺点就是如果有多个子目录都是一样的名称 那么这些名称就都不会被同步
  建议用–exclude-from=/home/svn/exclude.list 用文件的形式可以方便的添加和删除
exclude.list
利用SVN的钩子还可以写出很多的程序来控制SVN 如代码提交前查看是否有写日志,是否有tab,有将换成空格,是否有不允许上传的文件,是否有超过限制大小的文件等等。
最重要的是看帮助,如看post-commit默认的帮助

[root@moban hooks]# more post-commit.tmpl
#!/bin/sh
# POST-COMMIT HOOK
#
# The post-commit hook is invoked after a commit.  Subversion runs
# this hook by invoking a program (script, executable, binary, etc.)
# named ‘post-commit’ (for which this file is a template) with the
# following ordered arguments:
#
#   [1] REPOS-PATH   (the path to this repository)
#   [2] REV          (the number of the revision just committed)
#
# The default working directory for the invocation is undefined, so
# the program should set one explicitly if it cares.
#
# Because the commit has already completed and cannot be undone,
# the exit code of the hook program is ignored.  The hook program
# can use the ‘svnlook’ utility to help it examine the
# newly-committed tree.
#
# On a Unix system, the normal procedure is to have ‘post-commit’
# invoke other programs to do the real work, though it may do the
# work itself too.
#
# Note that ‘post-commit’ must be executable by the user(s) who will
# invoke it (typically the user httpd runs as), and that user must
# have filesystem-level permission to access the repository.
#
# On a Windows system, you should name the hook program
# ‘post-commit.bat’ or ‘post-commit.exe’,
# but the basic idea is the same.
#
# The hook program typically does not inherit the environment of
# its parent process.  For example, a common problem is for the
# PATH environment variable to not be set to its usual value, so
# that subprograms fail to launch unless invoked via absolute path.
# If you’re having unexpected problems with a hook program, the
# culprit may be unusual (or missing) environment variables.
#
# Here is an example hook script, for a Unix /bin/sh interpreter.
# For more examples and pre-written hooks, see those in
# the Subversion repository at
# http://svn.apache.org/repos/asf/subversion/trunk/tools/hook-scripts/ and
# http://svn.apache.org/repos/asf/subversion/trunk/contrib/hook-scripts/

二、利用pre-commit限制上传文件扩展名及大小
参考:
http://blog.chinaunix.net/uid-22646981-id-2921564.html
http://blog.chinaunix.net/uid-22646981-id-2921557.html

[root@moban ~]# svnlook –help
general usage: svnlook SUBCOMMAND REPOS_PATH [ARGS & OPTIONS …]
Note: any subcommand which takes the ‘–revision’ and ‘–transaction’
options will, if invoked without one of those options, act on
the repository’s youngest revision.
Type ‘svnlook help <subcommand>’ for help on a specific subcommand.
Type ‘svnlook –version’ to see the program version and FS modules.
Available subcommands:
author
cat
changed
date
diff
dirs-changed
help (?, h)
history
info
lock
log
propget (pget, pg)
proplist (plist, pl)
tree
uuid
youngest
[root@moban ~]# svnlook help log
log: usage: svnlook log REPOS_PATH
Print the log message.
Valid options:
-r [–revision] ARG      : specify revision number ARG
-t [–transaction] ARG   : specify transaction name ARG
[root@moban ~]# cd /application/svndata/sadoc/hooks/
[root@moban hooks]# vi pre-commit
#!/bin/sh

REPOS=”$1″
TXN=”$2″
#此处更改大小限制,为5M
MAX_SIZE=5242880
#此处限制文件后缀名
FILTER=’\.(zip|rar|o|obj|tar|gz)$’
# Make sure that the log message contains some text.

SVNLOOK=/usr/bin/svnlook
######svnlook log/cat
#svn提交时有个参数 -m 用来记录提交信息,下面这一段是为了验证提交信息长度(规范操作嘛,否则svn里真的是一堆垃圾了)
#LOGMSG=`$SVNLOOK log -t “$TXN” “$REPOS”|grep “[a-zA-Z0-9]”|wc -c`
LOGMSG=`$SVNLOOK log -t “$TXN” “$REPOS”|wc -c`

if [ “$LOGMSG” -lt 9 ];
then
echo -e “Log message cann’t be empty! you must input more than 8 chars as comment!” 1>&2
exit 1
fi

files=$($SVNLOOK changed -t “$TXN” “$REPOS”|cut -d ” ” -f 4-)
#echo “$files”>&2
#echo “$r”>&2
#exit 1

rc=0
echo “$files”|while read f;
do
#check file type
if echo $f|tr A-Z a-z|grep -Eq $FILTER;
then
echo “File $f is not allow ($FILTER) file” 1>&2
exit 1;
fi

#check file size
filesize=`$SVNLOOK cat -t “$TXN” “$REPOS” “$f”|wc -c`
if [ “$filesize” -gt “$MAX_SIZE” ];
then
echo “File $f is too large(must <=$MAX_SIZE) Byte” 1>&2
exit 1
fi
done

#All checks passed,so allow the commit.
if [ $? -eq 1 ];
then
exit 1
else
exit 0
fi
[root@moban hooks]# chmod 700 pre-commit

大中小型企业上线解决方案:
SVN目录组织结构说明
trunk <==主线(分支),与正式线相对应,当天不上线文件不允许提交。
branches <==分支,为测试时使用,几天以上的项目必须开分支,测试需要本分支通过,主线合并到分支通过,才能合并到主线进行测试。
tags <==版本记录用

SVN上线解决方案说明:
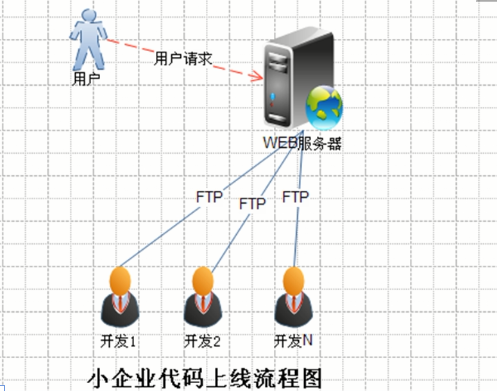
1.小型公司代码上线案例(通过FTP随时随地上传更新代码)

1、一般公司人员少,为了方便都随时随地更新,发布快;
2、经常不经测试人员测试就上线,拿用户来测试,用户体验较差;
3、据统计网站中50%的故障都是和代码有关,但都是运维人员承担责任。

建议:
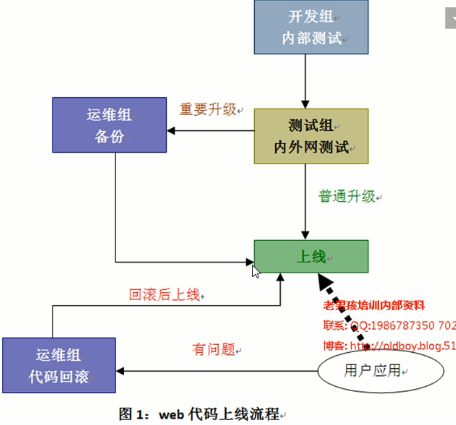
a、开发人员需在个人电脑搭建LNMP/LAMP环境进行测试代码,并且在办公室或IDC机房的测试环境测试通过,最好有专职测试人员。
b、规定代码上线时间,比如三天一上线,满足需求的同时也要有原则,一切为了客户体验度;
c、代码上线之前需要备份,出了问题方便回滚(新浪做法:先传到临时目录,传完整后再直接mv过去,或做软链接)

线上更新代码的思路。如果严格更新,把应用服务器从集群节点平滑下线,然后再更新。
d、上线尽量由运维人员管理操作上线,对于代码的功能性,开发人员更在意,而对于代码的性能优化和上线后服务器的稳定,运维更在意服务器的稳定,因此,如果网站宕机问题归运维管,就要让运维控制上线更科学。否则开发随意更新上传,出了问题运维负责,这样就太不科学了。

2.中型企业上线解决方案

中型企业上线,一般是规范运维人员的步骤,制定统一的上线脚本、备份脚本、回滚脚本,备份文件名称,备份文件路径,降低损失。使操作人性化,统一化,自动化。

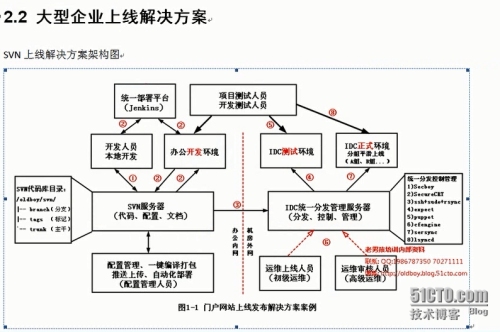
3.大型企业上线解决方案

大型企业上线,一般制度和流程控制较多,比较严谨。
1.特别是JAVA代码环境,上线时,有数台机器同时需要更新或者分批更新:
1).本地开发人员取svn代码。当天上线提交到trunk,否则,长期项目单开分支开发,然后在合并主线(trunk)
2).办公内网开发测试时,由开发人员或配置管理员通过部署平台jenkins实现统一部署,(即在部署平台上控制开发机器从svn取代码,编译,打包,发布到开发机,包名如idc_dep.war).
3).开发人员通知或和测试人员一起测试程序,没有问题后,由配置管理员打上新的tag标记。这里要注意,不同环境的配置文件是随代码同时发布的。
4).配置管理员,根据上一步的tag标记,checkout出上线代码,并配置好IDC测试环境的所有配置,执行编译,打包(mvn,ant)(php不需要打包),然后发布到IDC内的统一分发服务器。
5).配置管理员或SA上线人员,把分发的程序代码内容推送到相关测试服务器(包名如idc_test.war),然后通知开发及测试人员进行测试。如果有问题向上回退,继续修改。
6).如果IDC测试没有问题,继续打好tag标记,此时,配置管理员,根据上步的tag标记,checkout出测试好的代码,并配置好IDC正式环境的所有配置,执行编译,打包(mvn,ant)(php不需要打包),然后发布到IDC内的统一分发服务器主机,准备批量发布。
7).配置管理员或SA上线人员,把分发的内容推送到相关正式服务器(包名如idc_product.war),然后通知开发及测试人员进行测试。如果有问题直接发布回滚指令。

IDC正式上线的过程对于JAVA程序,可以是AB组分组上线的思路,即平滑下线一半的服务器,然后发布更新代码,重启测试,无问题后,挂上更新后的服务器,同时再平滑下线另一半的服务器,然后发布更新代码测试(或者直接发布后,重启,挂上线)

php程序代码上线的具体方案:
对于PHP上线方法:发布代码时(也需要测试流程)可以直接发布到正式线临时目录 ,然后mv或更改link的方式发布到正式上线目录 ,不需要重启http服务。这是新朗,赶集的上线方案。

JAVA程序代码上线的具体方案:
对于java上线方法:较大公司需要分组平滑上线(如从负载均衡器上摘掉一半的服务器),发布代码后,重启服务器测试,没问题后,挂上上好线的一半,再下另外一半。如果前端有DNS智能解析,上线还可以分地区上线若干服务器,逐渐普及到全国的服务器,这个被称为“灰度发布”,在后面门户网站上线的知识里我们在讲解。

代码上线解决方案注意事项:
1).上线的流程里,办公室测试环境–>IDC测试环境–>正式生产环境,所有环境中的所有软件均应版本统一,其次尽量单一,否则将后患无穷,开发测试成功,IDC测试就可能有问题(如:操作系统,web服务器,jdk,php,tomcat,resin等版本)
2).开发团队小组办公内部测试环境测试(该测试环境属于开发小组维护,或定时自动更新代码),代码有问题返回给某开发人员重新开发。
3).有专门的测试工程师,程序有问题直接返回给开发人员(此时返回的一般为程序的BUG,称为BUG库),无问题进行IDC测试
4).IDC测试由测试人员和运维人员参与,叫IDCtest,进行程序的压力测试,有问题直接返回给开发人员,无问题进行线上环境上线。
5).数台服务器代码分发上线方案举例(JAVA程序)
A:假设同业务服务器有6台,将服务器分为A,B两组,A组三台,B组三台,先对A组进行从负载均衡器上平滑下线,B组正常提供服务,避免服务器因上线影响业务。
B:下线过程是通过脚本将A组服务器从RS池(LVS,NGINX,HAPROXY,F5等均有平滑方案)中踢出,避免负裁均衡器将请求发送给A组服务器(此时的时间应该为网站流量少时,一般为晚上)
C:将代码分发到A组服务器的站点目录下,对A组服务器上线并重启服务,并由专业的测试人员进行访问测试,测试成功后,挂上A组的服务器,同时下线B组服务器,B组代码上线操作测试等和A组相同,期间也要观察上线提供服务的服务器状况,有问题及时回滚。
6).特别说明:如果是PHP程序,则上线可以简单化,直接将上线代码(最好全量)发布到所有上线服务器的特定目录后,分发完成后,一次性mv或ln到站点目录,当然测试也是少不了的。测试除了人员测试外,还有各种测试脚本测试各个相关业务接口。
7).大多数门户公司的前端页面都已经静态化或者cache了,因此,动态的部分访问平时就不会特别多,流量低谷时就更少了。再加上是平滑上下线,因此基本上是对用户体验无影响的,当然,也有上线出问题的情况,这个是避免不了的。
8)SVN上包含代码和配置
(1)、SVN上存放程序代码(不含资源,大公司基本资源和程序都是分离的)
尽可能全量上线的原因:因为我们务必要保证SVN的代码是最新的。
(2)、存放所有服务的配置文件(LAMP环境,如:apache的httpd.conf配置文件)
a)、开发小组测试环境使用的配置文件
b)、办公测试环使用配置文件
c)、IDC测试使用的配置文件
d)、线上应用使用的配置文件
在上线不同环境时,由配置管理员协调上线。

什么时配置管理员?
就是在开发和运维中间起一个连接纽带的一个职位,这个职位一般在大公司里会设置,负责SVN的管理,上线管理,流程申请,业务协调等工作。

平滑代码上线是什么?
就是在网站代码更新时,不影响正在浏览用户的正常浏览网页或其正使用的其他相关应用。

centos下ldap统一认证架构方案及实现指南

u22e阅读(1649)

一、ldap目录服务介绍
什么是目录服务?
目录是一类为了浏览和搜索数据而设计的特殊的数据库。例如,为人所熟知的微软公司的活动目录(active directory)就是目录数据库的一种。目录服务是按照树状形式存储信息的,目录包含基于属性的描述性信息,并且支持高级的过滤功能。

什么是LDAP?
LDAP是轻量目录访问协议,英文全称是Lightweight Directory Access Protocol,一般都简称为LDAP。它是基于X.500标准的,但是简单多了并且可以根据需要定制。与X.500不同,LDAP支持TCP/IP,这对访问Internet是必须的。LDAP的核心规范在RFC中都有定义,所有与LDAP相关的RFC都可以在LDAPman RFC网页中找到。

1、LDAP模型和扩展框架
信息模型:确定LDAP目录中信息的格式和字符集,如何表示目录信息(定义对象类、属性、匹配规则和语法等模式)
命名空间:信息组织方式-目录信息树DIT,以DN和RDN为基础的命名方式,以及LDAP信息的Internet表示方式
功能模型:执行操作的通信协议以及在客户端进行这些操作的API接口
安全框架:保证目录中信息的安全,多种认证方式,以及与TLS结合的通信保护框架
LDAP扩展框架:基于控制和扩展操纵的LDAP扩展框架

2、LDAP的存储方式
LDAP以树型结构存储,具体信息存储在条目的数据结构中。一个目录信息树由若干条目组成,一个条目一个对象,每个条目具有唯一的标识名DN,并由多个属性组成,每个属性对应一个或多个值。
LDAP目录服务器是通过目录数据库来存储网络信息以提供目录服务的,目录信息树及其相关概念构成了LDAP协议的信息模型。
注:dc(domain component)表示域名的部分,其格式是将完整的域名分为几部分;uid表示用户ID;ou(organization unit)表示组织单位;cn(common name)表示公共名称;关键字sn(surname)表示姓;dn(distinguished name)表示唯一辨别名,
rdn(relative dn)表示相对辨别名;关键字c(country)表示国家;关键字o(organization)表示组织名。

二、深入认识LDAP
1、LDAP的几种基本模型
LDAP的体系结构由信息模型、命名模型、功能模型以及安全模型4种基本模型组成。其中,信息模型描述LDAP的信息表示方式;命名模型描述LDAP的数据如何组织;功能模型描述LDAP的数据操作访问方式;安全模型描述LDAP的安全机制。
(1)信息模型
LDAP信息模型定义了能够在目录中存储的数据类型和基本的信息单位。LDAP中的信息是以树状结构组织,在树状信息中的基本数据单位是条目(即关于对象的信息集合),而每个条目由属性构成,属性中存储属性值,每个属性类型又有对应的语法和匹配规则。通常,条目中的信息说明真实世界的对象。
(2)命名模型
在LDAP中每个条目均有自己的DN和RDN(Relative Distinguished Name,相对标识名),其中DN是该条目在整个树中的唯一名称标识,而RDN是条目在父节点下的唯一名称标识。
dn:每个条目的唯一标识符,如上图中linuxprobe的dn值是:
cn=linuxprobe,ou=marketing,ou=people,dc=mydomain,dc=org
rdn:一般为dn值中最左侧的部分,如上图中linuxprobe的rdn值是:
cn=linuxprobe
base DN:此为基准DN值,表示顶层的根部,上图中的base DN值是:
dc=mydomain,dc=org
(3)功能模型
说明了能够使用LDAP协议对目录执行的操作,共4类10中操作。
更新类操作:添加条目、删除条目、修改条目、修改条目名
查询类操作:搜索、比较
认证类操作:绑定、解绑定
其他操作:放弃和扩展操作
注:除扩展操作,其余9种是LDAP的标准操作,扩展操作是LDAP中为了增加新的功能所提供的一种标准的扩展框架。
(4)安全模型
LDAP的安全模型主要通过身份认证、安全通道和访问控制来实现。
身份认证:
匿名认证:适用于没有数据安全问题且不涉及访问权限的完全公开方式
基本认证:通过用分辨名(DN)和密码进行身份识别,密码识别有分为简单密码和摘要密码认证
SASL(Simple Authentication and Secure Layer)认证:在SSL和TLS安全通道基础上进行的身份认证,包括数字证书的认证
通信安全在LDAP中提供了基于SSL/TLS的通信安全保障。SSL/TLS是基于PKI信息安全技术的,是目前Internet上广泛采用的安全服务。TLS服务可以被LDAP通过StartTLS方式启动,该服务既可以提供通信中的数据保密性、完整性保护,也可以实现客户端身份和服务器端身份的双向验证。
访问控制的标准:目前并无访问控制的标准,但LDAP的访问控制非常灵活和丰富。在LDAP中访问控制是通过访问控制策略语句来实现的,而RDBS和应用系统是通过访问控制列表来实现的。

2、LDAP的应用领域
LDAP被广泛用于基础性、关键性信息的管理。
信息安全类:数字证书管理、授权管理、单点登录
网络资源管理类:MAIL系统、DNS系统、网络用户管理、电话号码簿。
科学计算类:DCE(Distributed Computing Environment,分布式计算环境),UDDI(Universal Description,Discovery and Integration,统一描述,发现和集成协议)
电子政务资源管理:内网组织信息服务,电子政务目录体系,人口基础库,法人基础库
LDAP之所以能广泛用于管理用户信息、网络资源信息等,是由于LDAP具有高效率的查询,树状的信息管理模式,分布式的部署框架以及细致灵活的访问控制的特点。

三、OpenLDAP环境搭建
1.环境准备
[root@ldap ~]# cat /etc/redhat-release
CentOS release 6.8 (Final)
[root@ldap ~]# uname -r
2.6.32-642.el6.x86_64
[root@ldap ~]# hostname
ldap.server

2.服务端安装配置
[root@ldap ~]# getenforce
Enforcing
[root@ldap ~]# setenforce 0
[root@ldap ~]# service iptables stop
[root@ldap ~]# service ip6tables stop
[root@ldap ~]# chkconfig iptables off
[root@ldap ~]# chkconfig ip6tables off
[root@ldap ~]# getenforce
Permissive
[root@ldap ~]# ntpdate time.windows.com
[root@ldap ~]# date
Tue Nov  1 23:26:22 CST 2016
[root@ldap ~]# crontab -e
#time sync
*/5 * * * * /usr/sbin/ntpdate time.windows.com >/dev/null 2>&1
[root@ldap ~]# echo “192.168.0.111 etiantian.org” >>/etc/hosts
[root@ldap ~]# tail -1 /etc/hosts
192.168.0.111 etiantian.org
[root@ldap ~]# ping etiantian.org
PING etiantian.org (192.168.0.111) 56(84) bytes of data.
64 bytes from etiantian.org (192.168.0.111): icmp_seq=1 ttl=64 time=0.054 ms
64 bytes from etiantian.org (192.168.0.111): icmp_seq=2 ttl=64 time=0.037 ms
64 bytes from etiantian.org (192.168.0.111): icmp_seq=3 ttl=64 time=0.036 ms
64 bytes from etiantian.org (192.168.0.111): icmp_seq=4 ttl=64 time=0.038 ms

— etiantian.org ping statistics —
6 packets transmitted, 6 received, 0% packet loss, time 5567ms
rtt min/avg/max/mdev = 0.036/0.040/0.054/0.006 ms
[root@ldap ~]# mv /etc/yum.repos.d/CentOS-Base.repo /etc/yum.repos.d/CentOS-Base.repo.backup
[root@ldap ~]# wget -O /etc/yum.repos.d/CentOS-Base.repo http://mirrors.aliyun.com/repo/Centos-6.repo
[root@ldap ~]# yum makecache
[root@ldap ~]# rpm -qa |grep openldap compat-openldap-2.3.43-2.el6.x86_64 openldap-2.4.40-12.el6.x86_64
[root@ldap ~]# yum -y install openldap openldap-*
[root@ldap ~]# yum -y install nscd nss-pam-ldapd nss-* pcre pcre-*
[root@ldap ~]# yum -y install nscd nss-pam-ldapd nss-* pcre pcre-* –exclude=nss-softokn-freebl –skip-broken
[root@ldap ~]# yum -y install nss-pkcs11-devel
[root@ldap ~]# cd /etc/openldap/
[root@ldap openldap]# ll
total 20
drwxr-xr-x. 2 root root 4096 Nov  1 23:46 certs
-rw-r—–. 1 root ldap  121 May 11 07:32 check_password.conf
-rw-r–r–. 1 root root  280 May 11 07:32 ldap.conf
drwxr-xr-x. 2 root root 4096 Nov  1 23:46 schema
drwx——. 3 ldap ldap 4096 Nov  1 23:46 slapd.d
[root@ldap openldap]# ll slapd.d/
total 8
drwx——. 3 ldap ldap 4096 Nov  1 23:46 cn=config
-rw——-. 1 ldap ldap 1281 Nov  1 23:46 cn=config.ldif
[root@ldap openldap]# cp /usr/share/openldap-servers/slapd.conf.obsolete slapd.conf  //openldap的配置文件(2.3版的),此处2.4版的配置文件在/etc/openldap/slapd.d/cn=config
[root@ldap openldap]# slappasswd –help
slappasswd: invalid option — ‘-‘
Usage: slappasswd [options]
-c format     crypt(3) salt format
-g            generate random password
-h hash       password scheme
-n            omit trailing newline
-o <opt>[=val] specify an option with a(n optional) value
module-path=<pathspec>
module-load=<filename>
-s secret     new password
-u            generate RFC2307 values (default)
-v            increase verbosity
-T file       read file for new password
生成管理员密钥(记下生成出的值,后面要用):
方法一:
[root@ldap openldap]# slappasswd -s 123456
{SSHA}lIMVmm0Xk6gdurluKsvVWAsPTo5lUvJo
然后把上一步生成的管理员密钥加入到配置文件slapd.conf中,如下:
rootpw  {SSHA}lIMVmm0Xk6gdurluKsvVWAsPTo5lUvJo
方法二:
[root@ldap openldap]# slappasswd -s 123456|sed -e “s#{SSHA}#rootpw\t{SSHA}#g” >>slapd.conf
[root@ldap openldap]# tail -1 slapd.conf
rootpw  {SSHA}mDsZ2A7nq6PCQ9CQmLTZThIDqHbxvHT3
[root@ldap openldap]# cp slapd.conf slapd.conf.ori
[root@ldap openldap]# vim slapd.conf
114 #database       bdb
115 #suffix         “dc=my-domain,dc=com”
116 #checkpoint     1024 15
117 #rootdn         “cn=Manager,dc=my-domain,dc=com”
118 #add start by linuxzkq 2016/11/2
119 base       bdb
120 suffix     “dc=etiantian,dc=org”
121 rootdn     “cn=admin,dc=etiantian,dc=org”
122 #add end by linuxzkq 2016/11/2
提示:这是全部的配置内容,特别强调,参数在文件中的先后位置不能随意移动。
空行和以“#”开头的注释行将被忽略。如果一行以空格开头,它将被认为是接着前一行的(即使前一行是注释)。
[root@ldap openldap]# diff slapd.conf.ori slapd.conf
114,117c114,123
< database      bdb
< suffix                “dc=my-domain,dc=com”
< checkpoint    1024 15
< rootdn                “cn=Manager,dc=my-domain,dc=com”

> #database     bdb
> #suffix               “dc=my-domain,dc=com”
> #checkpoint   1024 15
> #rootdn               “cn=Manager,dc=my-domain,dc=com”
> #add start by linuxzkq 2016/11/2
> database       bdb  //指定使用的数据库
> suffix     “dc=etiantian,dc=org”  //指定要搜索的后缀
> rootdn     “cn=admin,dc=etiantian,dc=org”  //指定管理员dn路径,使用这个dn可以登录OpenLDAP服务器
> #add end by linuxzkq 2016/11/2
>
Ldap管理员:admin 密码:123456
[root@ldap openldap]# egrep -v “^$|#” slapd.conf
include         /etc/openldap/schema/corba.schema
include         /etc/openldap/schema/core.schema
include         /etc/openldap/schema/cosine.schema
include         /etc/openldap/schema/duaconf.schema
include         /etc/openldap/schema/dyngroup.schema
include         /etc/openldap/schema/inetorgperson.schema
include         /etc/openldap/schema/java.schema
include         /etc/openldap/schema/misc.schema
include         /etc/openldap/schema/nis.schema
include         /etc/openldap/schema/openldap.schema
include         /etc/openldap/schema/ppolicy.schema
include         /etc/openldap/schema/collective.schema
allow bind_v2
pidfile         /var/run/openldap/slapd.pid
argsfile        /var/run/openldap/slapd.args
TLSCACertificatePath /etc/openldap/certs
TLSCertificateFile “\”OpenLDAP Server\””
TLSCertificateKeyFile /etc/openldap/certs/password
database config
access to *
by dn.exact=”gidNumber=0+uidNumber=0,cn=peercred,cn=external,cn=auth” manage
by * none
database monitor
access to *
by dn.exact=”gidNumber=0+uidNumber=0,cn=peercred,cn=external,cn=auth” read
by dn.exact=”cn=Manager,dc=my-domain,dc=com” read
by * none
base       bdb
suffix     “dc=etiantian,dc=org”
rootdn     “cn=admin,dc=etiantian,dc=org”
directory       /var/lib/ldap
index objectClass                       eq,pres
index ou,cn,mail,surname,givenname      eq,pres,sub
index uidNumber,gidNumber,loginShell    eq,pres
index uid,memberUid                     eq,pres,sub
index nisMapName,nisMapEntry            eq,pres,sub
rootpw  {SSHA}mDsZ2A7nq6PCQ9CQmLTZThIDqHbxvHT3

Openldap参数配置优化:
a.日志及缓存参数
[root@ldap openldap]# cat >>slapd.conf<<EOF
> #add start by linuxzkq 2016/11/2
> loglevel      296
> cachesize     1000
> checkpoint    2048   10
> #add end by linuxzkq 2016/11/2
> EOF
[root@ldap openldap]# tail -6 slapd.conf
rootpw  {SSHA}mDsZ2A7nq6PCQ9CQmLTZThIDqHbxvHT3
#add start by linuxzkq 2016/11/2
loglevel      296
cachesize     1000
checkpoint    2048   10
#add end by linuxzkq 2016/11/2
b.授权及安全参数配置
Table 6.3: Access Entity Specifiers Specifier     Entities
*                             All, including anonymous and authenticated users
anonymous                     Anonymous (non-authenticated) users
users                             Authenticated users
self                             User associated with target entry  //自己
dn[.<basic-style>]=<regex>     Users matching a regular expression
dn.<scope-style>=<DN>             Users within scope of a DN

Table 6.4: Access Levels Level     Privileges     Description
none =             0     no access
disclose =     d     needed for information disclosure on error
auth =             dx     needed to authenticate (bind)
compare =     cdx     needed to compare
search =     scdx     needed to apply search filters
read =             rscdx     needed to read search results
write =     wrscdx     needed to modify/rename
manage =     mwrscdx needed to manage

A simple example:
access to * by * read
This access directive grants read access to everyone.
access to *
by self write
by anonymous auth
by * read

This directive allows the user to modify their entry, allows anonymous to authentication against these entries, and allows all others to read these entries. Note that only the first by <who> clause which matches applies. Hence, the anonymous users are granted auth, not read. The last clause could just as well have been “by users read”.
[root@ldap openldap]# vi slapd.conf
删除98行至108行内容:
98 database config
99 access to *
100       by dn.exact=”gidNumber=0+uidNumber=0
,cn=peercred,cn=external,cn=auth” manage
101        by * none
102
103 # enable server status monitoring (cn=monitor)
104 database monitor
105 access to *
106         by dn.exact=”gidNumber=0+uidNumber=0
,cn=peercred,cn=external,cn=auth” read
107         by dn.exact=”cn=Manager,dc=my-domain
,dc=com” read
108         by * none
然后加入以下内容:
access to *
by self write
by anonymous auth
by * read

配置rsyslog记录ldap服务日志:
[root@ldap openldap]# cp /etc/rsyslog.conf /etc/rsyslog.conf.ori
[root@ldap openldap]# echo “record ldap.log by linuxzkq 2016/11/2” >>/etc/rsyslog.conf
[root@ldap openldap]# echo “local4.*          /var/log/ldap.log”>> /etc/rsyslog.conf
[root@ldap openldap]# tail -2 /etc/rsyslog.conf
record ldap.log by linuxzkq 2016/11/2
local4.*          /var/log/ldap.log
[root@ldap openldap]# /etc/init.d/rsyslog restart
Shutting down system logger:                       [  OK  ]
Starting system logger:                            [  OK  ]
[root@ldap openldap]# ll /var/log/ldap.log
-rw——-. 1 root root 0 Nov  2 23:13 /var/log/ldap.log

配置LDAP数据库路径:
[root@ldap openldap]# grep “directory” slapd.conf|grep -v “#”
directory       /var/lib/ldap
[root@ldap openldap]# cp /usr/share/openldap-servers/DB_CONFIG.example /var/lib/ldap/DB_CONFIG
[root@ldap openldap]# ll /var/lib/ldap
total 4
-rw-r–r–. 1 root root 845 Nov  2 23:17 DB_CONFIG
[root@ldap openldap]# chown ldap:ldap /var/lib/ldap/DB_CONFIG
[root@ldap openldap]# chmod 700 /var/lib/ldap/DB_CONFIG
[root@ldap openldap]# ll /var/lib/ldap              total 4
-rwx——. 1 ldap ldap 845 Nov  2 23:17 DB_CONFIG
[root@ldap openldap]# egrep -v “\#|^$” /var/lib/ldap/DB_CONFIG
set_cachesize 0 268435456 1
set_lg_regionmax 262144
set_lg_bsize 2097152
[root@ldap openldap]# slaptest -u  //测试配置文件是否配置成功
config file testing succeeded
最终LDAP完整配置文件:
[root@ldap openldap]# egrep -v “^$|^.*#” slapd.conf
include         /etc/openldap/schema/corba.schema
include         /etc/openldap/schema/core.schema
include         /etc/openldap/schema/cosine.schema
include         /etc/openldap/schema/duaconf.schema
include         /etc/openldap/schema/dyngroup.schema
include         /etc/openldap/schema/inetorgperson.schema
include         /etc/openldap/schema/java.schema
include         /etc/openldap/schema/misc.schema
include         /etc/openldap/schema/nis.schema
include         /etc/openldap/schema/openldap.schema
include         /etc/openldap/schema/ppolicy.schema
include         /etc/openldap/schema/collective.schema
allow bind_v2
pidfile         /var/run/openldap/slapd.pid
argsfile        /var/run/openldap/slapd.args
TLSCACertificatePath /etc/openldap/certs
TLSCertificateFile “\”OpenLDAP Server\””
TLSCertificateKeyFile /etc/openldap/certs/password
access to *
by self write
by anonymous auth
by * read
base       bdb
suffix     “dc=etiantian,dc=org”
rootdn     “cn=admin,dc=etiantian,dc=org”
directory       /var/lib/ldap
index objectClass                       eq,pres
index ou,cn,mail,surname,givenname      eq,pres,sub
index uidNumber,gidNumber,loginShell    eq,pres
index uid,memberUid                     eq,pres,sub
index nisMapName,nisMapEntry            eq,pres,sub
rootpw  {SSHA}mDsZ2A7nq6PCQ9CQmLTZThIDqHbxvHT3
loglevel      296
cachesize     1000
checkpoint    2048   10
[root@ldap openldap]# diff slapd.conf.ori slapd.conf
98,108c98,101
< database config
< access to *
<       by dn.exact=”gidNumber=0+uidNumber=0,cn=peercred,cn=external,cn=auth” manage
<       by * none
<
< # enable server status monitoring (cn=monitor)
< database monitor
< access to *
<       by dn.exact=”gidNumber=0+uidNumber=0,cn=peercred,cn=external,cn=auth” read
<         by dn.exact=”cn=Manager,dc=my-domain,dc=com” read
<         by * none

>     access to *
>         by self write
>         by anonymous auth
>         by * read
114,117c107,116
< database      bdb
< suffix                “dc=my-domain,dc=com”
< checkpoint    1024 15
< rootdn                “cn=Manager,dc=my-domain,dc=com”

> #database     bdb
> #suffix               “dc=my-domain,dc=com”
> #checkpoint   1024 15
> #rootdn               “cn=Manager,dc=my-domain,dc=com”
> #add start by linuxzkq 2016/11/2
> base       bdb
> suffix     “dc=etiantian,dc=org”
> rootdn     “cn=admin,dc=etiantian,dc=org”
> #add end by linuxzkq 2016/11/2
>
141a141,145
> #add start by linuxzkq 2016/11/2
> loglevel      296
> cachesize     1000
> checkpoint    2048   10
> #add end by linuxzkq 2016/11/2
[root@ldap openldap]# /etc/init.d/slapd start
Starting slapd:                                    [  OK  ]
[root@ldap openldap]# netstat -tunlp|grep slapd
tcp        0      0 0.0.0.0:389                 0.0.0.0:*                   LISTEN      3002/slapd
tcp        0      0 :::389                      :::*                        LISTEN      3002/slapd
[root@ldap openldap]# lsof -i:389
COMMAND  PID USER   FD   TYPE DEVICE SIZE/OFF NODE NAME
slapd   3002 ldap    7u  IPv4  22382      0t0  TCP *:ldap (LISTEN)
slapd   3002 ldap    8u  IPv6  22383      0t0  TCP *:ldap (LISTEN)
[root@ldap openldap]# ps -ef|grep ldap|grep -v grep
ldap       3002      1  0 23:31 ?        00:00:00 /usr/sbin/slapd -h  ldap:/// ldapi:/// -u ldap
[root@ldap openldap]# chkconfig slapd on
[root@ldap openldap]# chkconfig –list slapd
slapd           0:off   1:off   2:on    3:on    4:o5:on     6:off

查看ldap master数据库:
[root@ldap openldap]# ldap
ldapadd      ldapmodify   ldapurl
ldapcompare  ldapmodrdn   ldapwhoami
ldapdelete   ldappasswd
ldapexop     ldapsearch
[root@ldap openldap]# ldapsearch -LLL -W -x -H ldap://etiantian.org -D “cn=admin,dc=etiantian,dc=org” -b “dc=etiantian,dc=org” “(uid=*)”
Enter LDAP Password:
ldap_bind: Invalid credentials (49)  //查询ldap数据库报错,密码对也连接不上。
出错,解决ldap2.3和2.4配置冲突问题,解决方法如下:
[root@ldap openldap]# ll /etc/openldap/slapd.d/
total 8
drwx——. 3 ldap ldap 4096 Nov  1 23:46 cn=config
-rw——-. 1 ldap ldap 1281 Nov  1 23:46 cn=config.ldif
[root@ldap openldap]# rm -rf /etc/openldap/slapd.d/*
[root@ldap openldap]# slaptest -f /etc/openldap/slapd.conf -F /etc/openldap/slapd.d
581a0d14 bdb_monitor_db_open: monitoring disabled; configure monitor database to enable
config file testing succeeded
[root@ldap openldap]# ll /etc/openldap/slapd.d      total 8
drwxr-x—. 3 root root 4096 Nov  2 23:59 cn=config
-rw——-. 1 root root 1301 Nov  2 23:59 cn=config.ldif
[root@ldap openldap]# /etc/init.d/slapd restart
Stopping slapd:                                    [  OK  ]
Checking configuration files for slapd:            [FAILED]
581a0daf ldif_read_file: Permission denied for “/etc/openldap/slapd.d/cn=config.ldif”
slaptest: bad configuration file!
[root@ldap openldap]# chown -R ldap.ldap /etc/openldap/slapd.d/
[root@ldap openldap]# ll /etc/openldap/slapd.d

total 8
drwxr-x—. 3 ldap ldap 4096 Nov  2 23:59 cn=config
-rw——-. 1 ldap ldap 1301 Nov  2 23:59 cn=config.ldif
[root@ldap openldap]# /etc/init.d/slapd restart
Stopping slapd:                                    [FAILED]
Starting slapd:                                    [  OK  ]
[root@ldap openldap]# lsof -i:389
COMMAND  PID USER   FD   TYPE DEVICE SIZE/OFF NODE NAME
slapd   3186 ldap    7u  IPv4  23490      0t0  TCP *:ldap (LISTEN)
slapd   3186 ldap    8u  IPv6  23491      0t0  TCP *:ldap (LISTEN)
[root@ldap openldap]# ldapsearch -LLL -W -x -H ldap://etiantian.org -D “cn=admin,dc=etiantian,dc=org” -b “dc=etiantian,dc=org” “(uid=*)”
Enter LDAP Password:
No such object (32)
至此问题解决。
查询LDAP的目录条目,介绍一下ldapsearch命令,具体可以使用man帮助手册查看。
-b:指定查找的节点
-D:指定查找的DN
-x:使用简单认证
-W:查询是输入密码,或者使用-w password
-h:OpenLDAP的主机地址,可以使用IP或者域名
-H:使用LDAP服务器的URI地址进行操作

为ldap master数据库添加数据的方法:
为ldap添加用户数据,有四种方法,分别如下,我们选择第四种方法进行试验。
1)可以直接修改slapd.d目录下面的数据文件,好处是不用重启服务,直接生效;
2)安装开源工具migrationtools来生成ldif文件,并通过ldapadd来添加;
3)安装ldap 客户端,这种方法最为简单;
4)直接编辑ldif文件,然后通过ldapadd添加。
首先我们手动编辑base.ldif文件,直接复制好像会因为格式有问题。每个条目之间有个空格,直接复制过去会有点问题,需要你把每个条目之间“空行”的第一个空格删除一下。
[root@ldap openldap]# vi base.ldif
dn: dc=etiantian,dc=org
objectClass: organization
objectClass: dcObject
dc: etiantian
o: etiantian

dn: ou=People,dc=etiantian,dc=org
objectClass: organizationalUnit
ou: People

dn: ou=group,dc=etiantian,dc=org
objectClass: organizationalUnit
ou: group

开始导入数据并初始化ldap测试数据:
[root@ldap openldap]# ldapadd -x -H ldap://etiantian.org -D “cn=admin,dc=etiantian,dc=org” -W -f base.ldif
Enter LDAP Password:
adding new entry “dc=etiantian,dc=org”

adding new entry “ou=People,dc=etiantian,dc=org”

adding new entry “ou=group,dc=etiantian,dc=org”

查询导入的结果:
[root@ldap openldap]# ldapsearch -LLL -x -H ldap://etiantian.org -D “cn=admin,dc=etiantian,dc=org” -b “dc=etiantian,dc=org” -w 123456
dn: dc=etiantian,dc=org
objectClass: organization
objectClass: dcObject
dc: etiantian
o: etiantian

dn: ou=People,dc=etiantian,dc=org
objectClass: organizationalUnit
ou: People

dn: ou=group,dc=etiantian,dc=org
objectClass: organizationalUnit
ou: group

然后我们通过user.ldif和group.ldif增加一个用户和一个组。
1.编辑用户和用户组配置文件
[root@ldap openldap]# vi user.ldif
dn: uid=test1,ou=People,dc=etiantian,dc=org
objectClass: posixAccount
objectClass: top
objectClass: inetOrgPerson
objectClass: shadowAccount
gidNumber: 0
givenName: test1
sn: test1
uid: test1
homeDirectory: /home/test1
loginShell: /bin/bash
shadowFlag: 0
shadowMin: 0
shadowMax: 99999
shadowWarning: 0
shadowInactive: 99999
shadowLastChange: 12011
shadowExpire: 99999
cn: test1
uidNumber: 24422
userPassword:: e1NIQX10RVNzQm1FL3lOWTNsYjZhMEw2dlZRR
VpOcXc9
[root@ldap openldap]# vi group.ldif
dn: cn=DBA,ou=group,dc=etiantian,dc=org
objectClass: posixGroup
objectClass: top
cn: DBA
memberUid: test1
gidNumber: 10673
2.添加用户和组
[root@ldap openldap]# ldapadd -x -H ldap://etiantian.org -D “cn=admin,dc=etiantian,dc=org” -f user.ldif -w 123456
adding new entry “uid=test1,ou=People,dc=etiantian,dc=org”
[root@ldap openldap]# ldapadd -x -H ldap://etiantian.org -D “cn=admin,dc=etiantian,dc=org” -f group.ldif -w 123456
adding new entry “cn=DBA,ou=group,dc=etiantian,dc=org”
3.查看是否添加成功
[root@ldap openldap]# ldapsearch -LLL -x -H ldap://etiantian.org -D “cn=admin,dc=etiantian,dc=org” -b “dc=etiantian,dc=org” -w 123456
dn: dc=etiantian,dc=org
objectClass: organization
objectClass: dcObject
dc: etiantian
o: etiantian

dn: ou=People,dc=etiantian,dc=org
objectClass: organizationalUnit
ou: People

dn: ou=group,dc=etiantian,dc=org
objectClass: organizationalUnit
ou: group

dn: uid=test1,ou=People,dc=etiantian,dc=org
objectClass: posixAccount
objectClass: top
objectClass: inetOrgPerson
objectClass: shadowAccount
gidNumber: 0
givenName: test1
sn: test1
uid: test1
homeDirectory: /home/test1
loginShell: /bin/bash
shadowFlag: 0
shadowMin: 0
shadowMax: 99999
shadowWarning: 0
shadowInactive: 99999
shadowLastChange: 12011
shadowExpire: 99999
cn: test1
uidNumber: 24422
userPassword:: e1NIQX10RVNzQm1FL3lOWTNsYjZhMEw2dlZRRVpOcXc9

dn: cn=DBA,ou=group,dc=etiantian,dc=org
objectClass: posixGroup
objectClass: top
cn: DBA
memberUid: test1
gidNumber: 10673

备份当前初始化的ldap数据库数据:
[root@ldap openldap]# ldapsearch -LLL -x -H ldap://etiantian.org -D “cn=admin,dc=etiantian,dc=org” -b “dc=etiantian,dc=org” -w 123456 >/data/bak_ldap_data.ldif
[root@ldap openldap]# ll /data/bak_ldap_data.ldif
-rw-r–r–. 1 root root 834 Nov  3 23:05 /data/bak_ldap_data.ldif

为ldap master配置web管理接口:
1.安装LAMP服务环境
[root@ldap openldap]# yum -y install httpd php php-ldap php-gd
[root@ldap openldap]# rpm -qa httpd php php-ldap php-gd
httpd-2.2.15-54.el6.centos.x86_64
php-gd-5.3.3-48.el6_8.x86_64
php-ldap-5.3.3-48.el6_8.x86_64
php-5.3.3-48.el6_8.x86_64
2.下载解压配置ldap客户端软件
[root@ldap openldap]# cd /var/www/html
[root@ldap html]# tar xf ldap-account-manager-3.9.tar.gz
[root@ldap html]# mv ldap-account-manager-3.9 ldap
[root@ldap html]# cd ldap/config
[root@ldap config]# cp config.cfg_sample config.cfg_sample.bak
[root@ldap config]# cp lam.conf_sample lam.conf_sample.bak
[root@ldap config]# mv lam.conf_sample lam.conf
[root@ldap config]# mv config.cfg_sample config.cfg
[root@ldap config]# sed -i ‘s#cn=Manager#cn=admin#g’ lam.conf
[root@ldap config]# sed -i ‘s#dc=my-domain#dc=etiantian#g’ lam.conf
[root@ldap config]# sed -i ‘s#dc=com#dc=org#g’ lam.conf
[root@ldap config]# diff lam.conf_sample lam.conf   13c13
< admins: cn=Manager,dc=my-domain,dc=com

> admins: cn=admin,dc=etiantian,dc=org
55c55
< types: suffix_user: ou=People,dc=my-domain,dc=com

> types: suffix_user: ou=People,dc=etiantian,dc=org
59c59
< types: suffix_group: ou=group,dc=my-domain,dc=com

> types: suffix_group: ou=group,dc=etiantian,dc=org
63c63
< types: suffix_host: ou=machines,dc=my-domain,dc=com

> types: suffix_host: ou=machines,dc=etiantian,dc=org
67c67
< types: suffix_smbDomain: dc=my-domain,dc=com

> types: suffix_smbDomain: dc=etiantian,dc=org
[root@ldap config]# chown -R apache.apache /var/www/html/ldap
[root@ldap config]# /etc/init.d/httpd start
Starting httpd:                                    [  OK  ]
登录ldap master的web管理接口:
http://192.168.0.111/ldap/templates/login.php
出现登录界面后,首先点击右上角的”LAM configuration”配置选项,再点击”Edit general settings”,按提示输入客户端的密码,默认为”lam”,配置修改”LAM configuration”的默认密码,这里设置为123456。然后登录,尽情的使用吧!

配置网络服务通过LDAP服务进行身份验证:
1.配置svn+sasl通过LDAP进行身份验证
a.安装配置svn服务(非apache svn)
见前一节课程:https://www.u22e.com/2481.html
b.启用svn服务器的SASL验证机制
SASL全称Simple Authentication and Security Layer,是一种用来扩充C/S模式验证能力的机制。简单认证与安全层 (SASL) 是一个在网络协议中用来认证和数据加密的构架。它把认证机制从程序中分离开, 理论上使用SASL的程序协议都可以使用SASL所支持的全部认证机制。认证机制可支持代理认证, 这让一个用户可以承担另一个用户的认证。 SASL同样提供数据安全层,这提供了数据完整验证和数据加密。支持SASL的应用程序通常也支持 传输层安全 (TLS) 作为对SASL提供的服务的补充。
[root@ldap sadoc]# rpm -qa|grep sasl
cyrus-sasl-lib-2.1.23-15.el6_6.2.x86_64
cyrus-sasl-2.1.23-15.el6_6.2.x86_64
cyrus-sasl-plain-2.1.23-15.el6_6.2.x86_64
cyrus-sasl-devel-2.1.23-15.el6_6.2.x86_64
系统默认安装了4个,包不全,接着安装相关SASL包。
[root@ldap sadoc]# yum -y install *sasl*
省略。。。。。。
Installed:
cyrus-sasl-gssapi.x86_64 0:2.1.23-15.el6_6.2
cyrus-sasl-ldap.x86_64 0:2.1.23-15.el6_6.2
cyrus-sasl-md5.x86_64 0:2.1.23-15.el6_6.2
cyrus-sasl-ntlm.x86_64 0:2.1.23-15.el6_6.2
cyrus-sasl-sql.x86_64 0:2.1.23-15.el6_6.2
python-saslwrapper.x86_64 0:0.14-1.el6
ruby-saslwrapper.x86_64 0:0.14-1.el6
saslwrapper.x86_64 0:0.14-1.el6
saslwrapper-devel.x86_64 0:0.14-1.el6
Dependency Installed:
postgresql-libs.x86_64 0:8.4.20-6.el6
ruby.x86_64 0:1.8.7.374-4.el6_6
ruby-libs.x86_64 0:1.8.7.374-4.el6_6
Complete!
[root@ldap sadoc]# rpm -qa|grep sasl
saslwrapper-devel-0.14-1.el6.x86_64
cyrus-sasl-ntlm-2.1.23-15.el6_6.2.x86_64
cyrus-sasl-lib-2.1.23-15.el6_6.2.x86_64
cyrus-sasl-2.1.23-15.el6_6.2.x86_64
saslwrapper-0.14-1.el6.x86_64
cyrus-sasl-sql-2.1.23-15.el6_6.2.x86_64
python-saslwrapper-0.14-1.el6.x86_64
cyrus-sasl-ldap-2.1.23-15.el6_6.2.x86_64
cyrus-sasl-md5-2.1.23-15.el6_6.2.x86_64
cyrus-sasl-plain-2.1.23-15.el6_6.2.x86_64
cyrus-sasl-devel-2.1.23-15.el6_6.2.x86_64
ruby-saslwrapper-0.14-1.el6.x86_64
cyrus-sasl-gssapi-2.1.23-15.el6_6.2.x86_64

查看密码验证机制列表,输入:
[root@ldap sadoc]# sasl
sasl2-sample-client    saslauthd
sasl2-sample-server    sasldblistusers2
sasl2-shared-mechlist  saslpasswd2
[root@ldap sadoc]# saslauthd -v
saslauthd 2.1.23
authentication mechanisms: getpwent kerberos5 pam rimap shadow ldap
[root@ldap sadoc]# grep -i “mech” /etc/sysconfig/saslauthd
# Mechanism to use when checking passwords.  Run “saslauthd -v” to get a list
# of which mechanism your installation was compiled with the ablity to use.
MECH=pam
# Options sent to the saslauthd. If the MECH is other than “pam” uncomment the next line.
[root@ldap sadoc]# sed -i ‘s#MECH=pam#MECH=shadow#g’ /etc/sysconfig/saslauthd
[root@ldap sadoc]# grep -i “mech” /etc/sysconfig/saslauthd|grep -v “#”
MECH=shadow
[root@ldap sadoc]# /etc/init.d/saslauthd restart
Stopping saslauthd:                            [FAILED]
Starting saslauthd:                            [  OK  ]
[root@ldap sadoc]# ps -ef|grep sasl
root       3817      1  0 21:49 ?        00:00:00 /usr/sbin/saslauthd -m /var/run/saslauthd -a shadow
root       3819   3817  0 21:49 ?        00:00:00 /usr/sbin/saslauthd -m /var/run/saslauthd -a shadow
root       3820   3817  0 21:49 ?        00:00:00 /usr/sbin/saslauthd -m /var/run/saslauthd -a shadow
root       3821   3817  0 21:49 ?        00:00:00 /usr/sbin/saslauthd -m /var/run/saslauthd -a shadow
root       3822   3817  0 21:49 ?        00:00:00 /usr/sbin/saslauthd -m /var/run/saslauthd -a shadow
root       3824   3717  0 21:49 pts/0    00:00:00 grep sasl

测试saslauthd进程的认证功能:
[root@ldap sadoc]# testsaslauthd -uadmin -p123456
0: NO “authentication failed”  //失败,因为系统用户里面没有这个用户,所以失败,下面添加用户。
[root@ldap sadoc]# grep “admin” /etc/passwd
[root@ldap sadoc]# id admin
id: admin: No such user
[root@ldap sadoc]# useradd admin
[root@ldap sadoc]# passwd admin
Changing password for user admin.
New password:
BAD PASSWORD: it is too simplistic/systematic
BAD PASSWORD: is too simple
Retype new password:  //设置密码为上面的”123456″
passwd: all authentication tokens updated successfully.
[root@ldap sadoc]# testsaslauthd -uadmin -p123456
0: OK “Success.”
[root@ldap sadoc]# testsaslauthd -utest1 -p123456
0: NO “authentication failed”  //使用LDAP的用户测试,认证失败,说明目前还不支持LDAP的用户。

测试通过LDAP进行验证:
[root@ldap sadoc]# man saslauthd  //man配置文件,输入”/ldap”搜索ldap相关配置。
SASLAUTHD(8)              BSD System Manager’s Manual             SASLAUTHD(8)
NAME
saslauthd – sasl authentication server
SYNOPSIS
saslauthd -a authmech [-Tvdchlr]
[-O option] [-m mux_path]
[-n threads] [-s size]
[-t timeout]
DESCRIPTION
saslauthd is a daemon process that
…skipping…
ldap       (All platforms that support
OpenLDAP 2.0 or higher)
Authenticate against an
ldap server.  The ldap con-
figuration parameters are
read from /etc/saslau-
thd.conf.  The location of
this file can be changed
with the -O parameter. See
the LDAP_SASLAUTHD file
included with the distribu-
tion for the list of avail-
able parameters.
[root@ldap sadoc]# history|grep sed
8  sed -i ‘s/keepcache=0/keepcache=1/g’ /etc/yum.conf
275  slappasswd -s 123456|sed -e “s#{SSHA}#rootpw\t{SSHA}#g” >>slapd.conf
383  sed -i ‘s#cn=Manager#cn=amin#g’ lam.conf
384  sed -i ‘s#dc=my-domain#dc=etiantian#g’ lam.conf
385  sed -i ‘s#dc=com#dc=org#g’ lam.conf
387  sed -i ‘s#cn=amin#cn=admin#g’ lam.conf
411  sed -i ‘s#MECH=pam#MECH=shadow#g’ /etc/sysconfig/saslauthd
426  history|grep sed
[root@ldap sadoc]# sed -i ‘s#MECH=shadow#MECH=ldap#g’ /etc/sysconfig/saslauthd
[root@ldap sadoc]# grep -i “mech” /etc/sysconfig/saslauthd|grep -v “#”
MECH=ldap
[root@ldap sadoc]# /etc/init.d/saslauthd restart
Stopping saslauthd:                            [  OK  ]
Starting saslauthd:                            [  OK  ]
[root@ldap sadoc]# testsaslauthd -utest1 -p123456
0: NO “authentication failed”
[root@ldap sadoc]# testsaslauthd -uadmin -p123456
0: NO “authentication failed”
再次使用系统用户admin和ldap用户test1认证都失败了。

配置saslauthd连接LDAP的连接信息:
[root@ldap sadoc]# vi /etc/saslauthd.conf
ldap_servers: ldap://etiantian.org/
#ldap_uri: ldap://ldap.test1.etiantian.org/
#ldap_version: 3
#ldap_start_tls: 0
ldap_bind_dn: cn=admin,dc=etiantian,dc=org
ldap_bind_pw: 123456
ldap_search_base: ou=People,dc=etiantian,dc=org
ldap_filter: uid=%U
#ldap_filter: mail=%U@etiantian.org
ldap_password_attr: userPassword
#ldap_sasl: 0
[root@ldap sadoc]# /etc/init.d/saslauthd restart
Stopping saslauthd:                            [  OK  ]
Starting saslauthd:                            [  OK  ]
[root@ldap sadoc]# testsaslauthd -u oldboy -p 123456
0: OK “Success.”  //ldap用户认证成功
[root@ldap sadoc]# testsaslauthd -u test1 -p 123456
0: OK “Success.”  //ldap用户认证成功
[root@ldap sadoc]# testsaslauthd -u admin -p 123456
0: NO “authentication failed”  //系统用户admin认证失败

开发脚本一键安装svn服务并测试成功:
[root@client ~]# vi auto_install_svn.sh
#!/bin/sh
#the scripts is auto_install_svn script command
#date:2016-11-04
#author:linuxzkq
#mail:1729294227@qq.com
#version:v1.0

#yum install svn
yum -y install subversion

#set “keepcache=1”
sed -i ‘s/keepcache=0/keepcache=1/g’ /etc/yum.conf
grep “keepcache” /etc/yum.conf

#create svn svndata and svnpasswd directory
mkdir -p /application/svndata
mkdir -p /application/svnpasswd

#start svn
svnserve -d -r /application/svndata/
ps -ef| grep svn|grep -v grep
netstat -tunlp|grep 3690

#create svn Project
svnadmin create /application/svndata/sadoc

#start config svn
cd /application/svndata/sadoc/conf/
/bin/cp svnserve.conf svnserve.conf.bak
sed -i ‘s/# anon-access = read/anon-access = none/g’ svnserve.conf
sed -i ‘s/# auth-access = write/auth-access = write/g’ svnserve.conf
sed -i ‘s@# password-db = passwd@password-db = /application/svnpasswd/passwd@g’ svnserve.conf
sed -i ‘s@# authz-db = authz@authz-db = /application/svnpasswd/authz@g’ svnserve.conf

#start config svn passwd and authz
/bin/cp authz passwd /application/svnpasswd/
chmod 700 /application/svnpasswd/*
cat >>/application/svnpasswd/passwd<<EOF
linuxzkq = 123456
guest = guest
EOF
cat >>/application/svnpasswd/authz<<EOF
[groups]
linux = linuxzkq,guest
[sadoc:/]
linuxzkq = rw
guest = r
@linux = r
* =
EOF

#restart svn
pkill svnserve
sleep 3
svnserve -d -r /application/svndata/

#test local file
echo “please exec the cmd bellow:”
echo “svn checkout svn://192.168.0.110/sadoc /opt –username=linuxzkq –password=123456”
sleep 600

配置svn通过LDAP验证并且授权:
[root@ldap ~]# ll /etc/sasl2/
total 4
-rw-r–r–. 1 root root 49 Feb 20  2014 smtpd.conf
[root@ldap ~]# vi /etc/sasl2/svn.conf
pwcheck_method: saslauthd
mech_list: PLAIN LOGIN
[root@ldap ~]# cp /application/svndata/sadoc/conf/svnserve.conf /application/svndata/sadoc/conf/svnserve.conf.ori
[root@ldap ~]# sed -i ‘s@# use-sasl = true@use-sasl = true@g’ /application/svndata/sadoc/conf/svnserve.conf
[root@ldap ~]# grep “sasl” /application/svndata/sadoc/conf/svnserve.conf
[sasl]
use-sasl = true
[root@ldap ~]# vi /application/svnpasswd/authz
在[groups]标签下加入:
ldap = test1,oldboy
在[sadoc:/]标签下加入:
@ldap = rw
特别注意:加入以上内容,给予ldap用户访问svn版本库的权限。
[root@ldap ~]# pkill svnserve
[root@ldap ~]# svnserve -d -r /application/svndata
[root@ldap ~]# netstat -tunlp|grep 3690
tcp        0      0 0.0.0.0:3690                0.0.0.0:*                   LISTEN      1870/svnserve
[root@ldap ~]# svn checkout svn://192.168.0.111/sadoc /opt –username=oldboy –password=123456
A    /opt/a
A    /opt/22.txt
A    /opt/b
A    /opt/c
A    /opt/d
A    /opt/7.txt
A    /opt/8.txt
A    /opt/新建 Microsoft Access 数据库.accdb
A    /opt/55.txt
Checked out revision 48.
[root@ldap ~]# svn ls svn://192.168.0.111/sadoc –username=test1 –password=123456
22.txt
55.txt
7.txt
8.txt
a
b
c
d
通过以上结果,可以看出ldap用户oldboy访问svn版本库正常。

svn通过ldap验证的总结:
1.配置成功saslauthd,前提条件;
2.配置/etc/sasl2/svn.conf;
[root@ldap ~]# vi /etc/sasl2/svn.conf
pwcheck_method: saslauthd
mech_list: PLAIN LOGIN
3.配置好svn服务,并且开启sasl支持,重启svn;
[root@ldap ~]# grep “sasl” /application/svndata/sadoc/conf/svnserve.conf
[sasl]
use-sasl = true
4.配置authz授权ldap用户访问相关项目的权限;
[root@ldap ~]# vi /application/svnpasswd/authz
在[groups]标签下加入:
ldap = test1,oldboy
在[sadoc:/]标签下加入:
@ldap = rw
5.测试访问linux或win32
[root@ldap ~]# svn ls svn://192.168.0.111/sadoc –username=test1 –password=123456

Red Hat Enterprise Linux 8/7/6/5/4 合集下载地址

u22e阅读(16936)

第0章 咱们先来谈谈学习方法和红帽系统。第0章 咱们先来谈谈学习方法和红帽系统。

红帽公司成立于1993年,是全球首家收入超10亿美元的开源公司,总部位于美国,分支机构遍布全球。红帽公司作为全球领先的开源和Linux系统提供商,其产品已被业界广泛认可并使用,尤其是RHEL系统在业内拥有超高的Linux系统市场占有率。红帽公司除了提供操作系统之外,还提供了虚拟化、中间件、应用程序、管理和面向服务架构的解决方案。

红帽认证是由红帽公司推出的Linux认证,该认证被认为是Linux行业乃至整个IT领域价值最高的认证之一。红帽认证考试全部采用上机形式,在考察学生基础理论能力的同时还考察了实践动手操作以及排错能力。红帽公司针对红帽认证制定了完善的专业评估与认证标准,其认证主要包括红帽认证系统管理员(RHCSA)、红帽认证工程师(RHCE)与红帽认证架构师(RHCA)。

Red Hat Enterprise Linux,即RHEL,是全世界内使用最广泛的Linux系统。RHEL系统具有极强的性能与稳定性,并且在全球范围内拥有完善的技术支持。

本页面将会持续更新RHEL系统的最新系统及下载地址,敬请您关注收藏。

系统版本 发布日期 下载地址
Red Hat Enterprise Linux 8.0 2019-04-11 点此下载,验证码:ahav
Red Hat Enterprise Linux 7.6 2018-10-30 点此下载,验证码:e914
Red Hat Enterprise Linux 7.5 2018-04-10 点此下载,验证码:2eba
Red Hat Enterprise Linux 7.4 2017-07-31 点此下载,验证码:7m0j
Red Hat Enterprise Linux 7.3 2016-11-03 点此下载,验证码:pz8v
Red Hat Enterprise Linux 7.2 2015-11-19 点此下载,验证码:8iel
Red Hat Enterprise Linux 7.1 2015-03-05 点此下载,验证码:ujzm
Red Hat Enterprise Linux 7.0 2014-06-09 点此下载,验证码:3e6m
Red Hat Enterprise Linux 6.10 2018-06-19 点此下载,验证码:xnpu
Red Hat Enterprise Linux 6.9 2017-03-21 点此下载,验证码:ax9e
Red Hat Enterprise Linux 6.8 2016-05-10 点此下载,验证码:3uz5
Red Hat Enterprise Linux 6.7 2015-07-22 点此下载,验证码:hpfo
Red Hat Enterprise Linux 6.6 2014-10-14 点此下载,验证码:fald
Red Hat Enterprise Linux 6.5 2013-11-21 点此下载,验证码:aio7
Red Hat Enterprise Linux 6.4 2013-02-21 点此下载,验证码:l2zv
Red Hat Enterprise Linux 6.3 2012-06-20 点此下载,验证码:jbp4
Red Hat Enterprise Linux 6.2 2011-12-06 点此下载,验证码:r2no
Red Hat Enterprise Linux 6.1 2011-05-19 点此下载,验证码:e9rd
Red Hat Enterprise Linux 6.0 2010-11-09 点此下载,验证码:trt2
Red Hat Enterprise Linux 5.11 2014-09-16 点此下载,验证码:bp9c
Red Hat Enterprise Linux 5.10 2013-10-01 点此下载,验证码:7bcy
Red Hat Enterprise Linux 5.9 2013-01-07 点此下载,验证码:jh3t
Red Hat Enterprise Linux 5.8 2012-02-20 点此下载,验证码:xme3
Red Hat Enterprise Linux 5.7 2011-07-21 点此下载,验证码:m6kq
Red Hat Enterprise Linux 5.6 2011-01-13 点此下载,验证码:1t7f
Red Hat Enterprise Linux 5.5 2010-03-30 点此下载,验证码:v2oy
Red Hat Enterprise Linux 5.4 2009-09-02 点此下载,验证码:u4je
Red Hat Enterprise Linux 5.3 2009-01-20 点此下载,验证码:kv0u
Red Hat Enterprise Linux 5.2 2008-05-21 点此下载,验证码:yvtz
Red Hat Enterprise Linux 5.1 2007-11-07 点此下载,验证码:h699
Red Hat Enterprise Linux 5.0 2007-03-15 点此下载,验证码:fz9n
Red Hat Enterprise Linux 4.8 2009-05-19 点此下载,验证码:pnc7
Red Hat Enterprise Linux 4.7 2008-07-29 点此下载,验证码:xbxn
Red Hat Enterprise Linux 4.6 2007-11-15 点此下载,验证码:7uld
Red Hat Enterprise Linux 4.5 2007-05-01 点此下载,验证码:hxzk
Red Hat Enterprise Linux 4.4 2006-08-10 点此下载,验证码:t8r1
Red Hat Enterprise Linux 4.3 2006-03-12 点此下载,验证码:4xdb
Red Hat Enterprise Linux 4.2 2005-10-05 点此下载,验证码:c35e
Red Hat Enterprise Linux 4.1 2005-06-08 点此下载,验证码:tdp3
Red Hat Enterprise Linux 4.0 2005-02-15 点此下载,验证码:ym7i
Red Hat Enterprise Linux 3.9 2007-06-20 官方未提供下载
Red Hat Enterprise Linux 3.8 2006-07-20 官方未提供下载
Red Hat Enterprise Linux 3.7 2006-03-17 官方未提供下载
Red Hat Enterprise Linux 3.6 2005-09-28 官方未提供下载
Red Hat Enterprise Linux 3.5 2005-05-18 官方未提供下载
Red Hat Enterprise Linux 3.4 2004-12-12 官方未提供下载
Red Hat Enterprise Linux 3.3 2004-09-03 官方未提供下载
Red Hat Enterprise Linux 3.2 2004-05-12 官方未提供下载
Red Hat Enterprise Linux 3.1 2004-01-16 官方未提供下载
Red Hat Enterprise Linux 3.0 2003-10-22 官方未提供下载
Red Hat Enterprise Linux 2.7 2005-04-28 官方未提供下载
Red Hat Enterprise Linux 2.6 2004-12-13 官方未提供下载
Red Hat Enterprise Linux 2.5 2004-08-18 官方未提供下载
Red Hat Enterprise Linux 2.4 2004-04-21 官方未提供下载
Red Hat Enterprise Linux 2.3 2004-12-19 官方未提供下载
Red Hat Enterprise Linux 2.2 2003-03-29 官方未提供下载
Red Hat Enterprise Linux 2.1 2003-02-14 官方未提供下载
Red Hat Enterprise Linux 2.0 2002-03-23 官方未提供下载

中国程序员最容易读错的单词汇总(带正确发音示范)

u22e阅读(726)

日常生产中,当我们需要查阅某个服务的官方文档,或者学习某些最新技术资料时,经常会是英文内容。阅读其实并不困难,或者Google翻译软件就能帮您搞定,但是转述给同事、或者与他人交谈中的发音问题怎么办呢?

本文即针对程序员及运维同胞们最容易读错的单词进行汇总,例如“VUE ”是不是很多同学此前一直读成“V—U—E ”,即分成三个字母来读呢?这样不仅在工作中有些“露怯”,更重要的是英语国家的同事会听不懂您的表达。

本页面中所有读音均由运维那些事老师录制,并持续更新。

我们建议您收藏本页面,以备今后不时之需

单词 正确发音 含义 演示
access [‘ækses] 一种数据库
admin [‘ædmɪn] 管理员
agile [‘ædʒaɪl] 轻量级
amazon [‘æməzən] 亚马逊
analogy [əˈnælədʒi] 模拟
Angular [‘æŋgjʊlə] 前端JS框架
AJAX [‘eidʒæks] 交互式网页
alias [ˈeɪliəs] 别名
Apache [ə’pætʃɪ] 一个网站服务软件
app [æp] 手机软件
archive [‘ɑːkaɪv] 存档
array [ə’rei] 数组
ASCII [‘æski] 一种编码系统
aspect [‘æspekt] 方向
avatar [‘ævətɑː] 头像
Azure [‘æʒə] 一种云服务
bind [baɪnd] 一个DNS软件
cache [kæʃ] 缓存
Daemon [‘diːmən] 守护进程
deny [dɪ’naɪ] 拒绝
deque [‘dek] 队列
digest [‘dɑɪdʒɛst] 整理
Django [ˈdʒæŋɡoʊ] 一个网站框架
doc [dɒk] 一种文档类型
event [ɪ’vent] 事件
facade [fə’sɑːd] 外观模式
fedora [fɪ’dɔːrə] 一个操作系统
format [‘fɔːmæt] 格式化
Git [ɡɪt] 一个版本控制软件
Haskell [ˈhæskəl] 一个编程语言
height [haɪt] 高度
hidden [‘hɪdn] 隐藏
image [‘ɪmɪdʒ] 图片
implement [‘ɪmplɪm(ə)nt] 实施
integer [‘ɪntɪdʒə] 整数类型
issue [‘ɪʃuː] 发行版本
Java [‘dʒɑːvə] 一个编程语言
lambda [ˈlæmdə] 一种匿名函数
linear [‘lɪnɪə] 线性模型
Linux [‘lɪnəks] 一种操作系统
locale [ləʊ’kɑːl] 地点
main [meɪn] 主要的
margin [‘mɑːdʒɪn] 边缘
matrix [ˈmeɪtrɪks] 母体
maven [‘meɪvn] 一个项目管理软件
Microsoft [‘maikrəusɔft] 微软
module [‘mɒdjuːl] 模块
null [nʌl] 失效的
phantom [‘fæntəm] 虚构
parameter [pə’ræmɪtə] 参数
putty [ˈpʌti] 一个远程控制软件
query [‘kwɪəri] 询问
Qt [kjuːt] 一种开发架构
Realm [relm] 一种移动数据库软件
resolved [rɪ’zɒlvd] 已解决
resort [rɪˈzɔ:t] 求助
retina [‘retɪnə] 一种显示屏
safari [sə’fɑːrɪ] 一个浏览器软件
scheme [skiːm] 一种编程语言
suite [swiːt] 套件
typical [‘tɪpɪkl] 典型的
Ubuntu [ʊ’bʊntʊ] 一种操作系统
variable [‘veəriəbl] 变量
vue [v’ju:] 计算机考试
width [wɪdθ] 宽度
YouTube [‘juː’tjuːb] 一个视频网站

ubuntu18.04安装cuda10.1

u22e阅读(2128)

1.下载cuda

https://developer.nvidia.com/cuda-downloads?target_os=Linux&target_arch=x86_64&target_distro=Ubuntu&target_version=1804&target_type=deblocal

执行以下命令

sudo dpkg -i cuda-repo-ubuntu1804-10-1-local-10.1.168-418.67_1.0-1_amd64.deb执行完毕根据提示执行

sudo apt-key add /var/cuda-repo-10-1-local-10.1.168-418.67/7fa2af80.pub

在执行下面两个

$ sudo apt-get update

$ sudo apt-get install cuda

重新启动电脑

2.验证安装的版本信息

 $ lspci | grep -i nvidia

有看到下图 VGA compatible 以及 Serial bus 相关讯即代表 ok

$ gcc --version

查看版本多少


3.Disable the Nouveau drivers

先在以下路径建立档案

/usr/lib/modprobe.d/blacklist-nouveau.conf

并且在档案里写入下列资料

blacklist nouveau
options nouveau modeset=0
[note]: 记得修改属性为root:root

再執行以下 command

sudo update-initramfs -u


4.Post-installation Actions

将以下 PATH 的设定写入 .bashrc

export PATH=/usr/local/cuda-10.1/bin:/usr/local/cuda-10.1/NsightCompute-2019.1${PATH:+:${PATH}}

重新开机再往下操作

重新开机后如果看到以下讯息表示己经安装成功

nvidia-smi

nvcc --version